
Docusign Maestro: Tips for a Streamlined Setup and Workflow
Here is everything you need to know before starting to build your first Docusign Maestro workflow for intelligent agreement management.
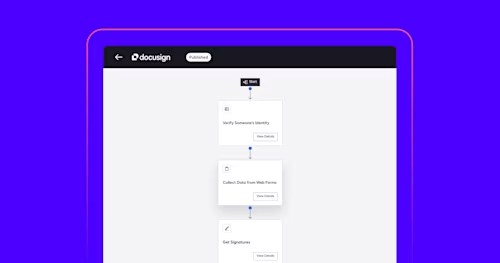

Here is what you need to know before starting to build your first Docusign Maestro workflow. Maestro is a core platform service that’s part of Docusign IAM and helps your team create custom workflows by connecting all of the seemingly separate pieces of their agreement process into one cohesive workflow — all without writing a single line of code.
Common use cases
Here are a few popular use cases organizations can deploy:
Automate customer payment collection. Automate customer payments using Web Forms and eSignature to collect payment information, and then connect to 3rd party apps like Salesforce to update CRM records and Google Drive to archive signed agreements.
Account maintenance. Use a Web Form to easily capture customer information, then use the updated information (e.g. address, billing info, etc.) to populate the Identity Verification (IDV) step so the customer can then finish updating their information.
Onboard new rental properties. A property management company collects property owner signatures via eSignature, then stores these signed documents in Google Drive for the internal team to take action on, before passing these documents to individual reps from the management company to sign with eSignature.
Things to know before getting started
Familiarize yourself with Templates and Web Forms
Two vital components of Maestro are Docusign Templates and Web Forms, both essential to the agreement process by helping you streamline data collection, eliminate redundancies for your signers, and collect signatures faster.
Templates are blueprints for repeatable envelopes — streamlining the sending process so you can collect signatures faster. To learn how to use Docusign Templates, we have a variety of instructional materials, how-to videos, and informative support guides:
Template Library: Download free templates for your industry and specific use cases, then upload them to your account to start using them.
Contract and Form Templates Guide blog goes over how to save and reuse templates, which frees up valuable time and energy for your organization.
Working with Templates is a comprehensive guide that goes over every facet of creating, editing, and deleting templates from your Docusign account.
Web Forms allow you to capture data and dynamically populate content into agreements for signature — all from a URL that you can share with customers via email, website, or SMS.
Check out the Web Forms Get Started page to get up and running quickly and easily.
Leverage Docusign App Center
Maestro integrates with popular applications you may already use that can be found in the new Docusign App Center — like Salesforce, Google Drive, Dropbox, Stripe, ServiceNow and HubSpot.
Seamlessly add these applications into your agreement workflow with Maestro and in doing so, remove the complexities and bottlenecks of patching separate systems together in the agreement process.
Learn how to use the App Center, including how to install and manage your apps, all in this helpful guide.
Maestro user permissions
Creating agreement workflows using Maestro requires specific user permissions. By default, all account administrators have the required permissions. However, note that individual account users must check with their account administrator to ensure they’re enabled to use Maestro.
Check out this Support guide to learn how to set user permissions for Maestro.
Workflow participants and starting variables
When you create a Maestro workflow, you must consider the different roles of participants and any data that must be provided to them at the beginning of the agreement process. Starting variables are these pieces of vital information passed along from one step to the next in your Maestro workflow.
Consider the following questions, to help you create starting variables:
Who from your organization needs information in an agreement?
What vital information, like name an email, should be pre-populated into each step of the agreement process?
Learn more about workflow participants and starting variables in this guide:
Tips & tricks for building a Maestro workflow
We’ll walk you through some best practices for building a Maestro workflow in step-by-step fashion. Dive into the section that best suits what you’re interested in, depending on the workflow steps you plan to use.
Create workflow-specific Web Forms
In order to deploy Web Forms within your Maestro workflow, you’ll first need to make a workflow-specific copy of an existing Web Form.
Navigate to Templates on the top navigation, then find My Web Forms under the Web Forms section of the lower-left hand Templates navigation.
Select the Web Form to duplicate for your Maestro workflow by clicking the three dots on the right, then click on Create Workflow Version.
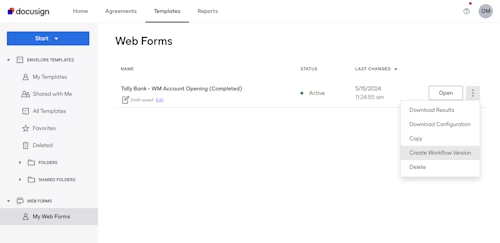
Notice your Workflow Copy Web Form as “Inactive” in Status. You’ll need to open it up to activate it by selecting Open.
Now, you’ll see your workflow-specific Web Form. Here you can edit it as you’d like by selecting each Outline piece on the left hand side of the menu. Once it’s in a good place to use in your Maestro workflow, hit the Activate button. Now, it’s ready to deploy in your Maestro workflow.
Define starting variables
Starting variables represent dynamic inputs in your Maestro workflow, which can exchange vital information from one step of your workflow to the next. Additionally, you can create a new starting variable as you begin your workflow, especially if it’s the first step — as you won’t have any previously created variables to choose from.
Note, you don’t have to necessarily use Identity Verification (IDV) as a Maestro workflow step when defining a starting variable; you can define a starting variable with other workflow steps.
The following steps use IDV and an example to showcase how to define a starting variable:
After configuring IDV in your workflow, you’ll find a yellow window (in step 3) telling you to add a variable while setting up IDV. Note, you don’t necessarily need to add a starting variable here, but it is very helpful in mapping that to your participant’s identity.
Click Add Starting Variable to move on:
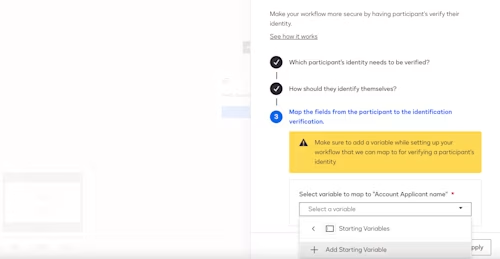
Scroll down on the following Workflow Setup screen, all the way to the bottom, then select Add Variable, then Text (most common).
Next, you can type in a starting variable of your choice. Additionally, there are Numbers and two advanced options to choose from.
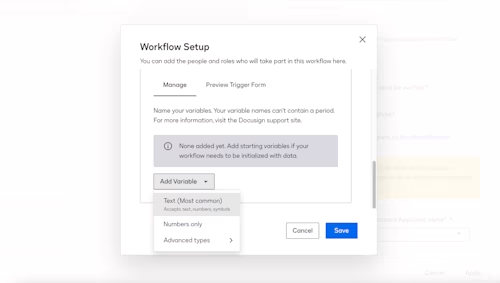
For this example, add Name as your starting variable, then hit Save.
From here, you can choose the variable you just created from the following dropdown menu, before hitting Apply.
When you link this up to the next step of the workflow, this starting variable should be visible to hand off this vital information collected in the first IDV step. This way, your recipients won’t have to re-enter all of their information in the next step saving time and increasing accuracy in data collection.
Branching Logic Options and Configuration
Branching Logic is a great way to appropriately funnel your workflow participants through by applying required logic before they can make it to the next step in the agreement process.
It’s simple to deploy into your workflow. Simply click the blue + icon, then scroll down to Add a Branching Rule.
Next hit configure.
You’ll now be introduced to the following Branching Rule options, which allow you to choose the logic you’d like to introduce to this workflow, along with the defined rules and what to look for.
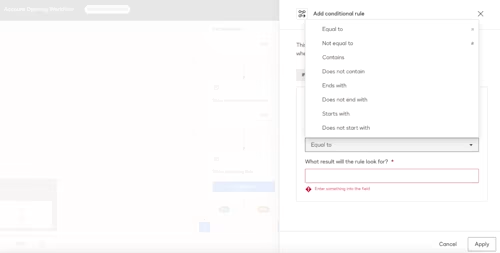
Additionally, you’ll need to choose a starting variable. This can be something you just created or a vital piece of information from a previous workflow step.
If you take the Name variable we created for the IDV section above, you could do something like the following:
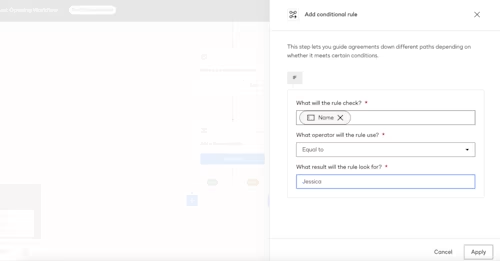
This would then only allow recipients to pass through to the next step if their name from the first Identity Verification step is listed as Jessica. There are many more ways to implement these branching rules, but for the sake of simplicity we wanted to outline a very simple use case here.
You can learn more about how to configure this Branch Logic here, if you’re interested.
Ready to start building your Maestro workflow?
Looking to start building your workflow using the steps we’ve outlined? Learn more about Docusign Maestro.
Log in to get started today with Maestro. If you need more information on this vital platform service before making an educated purchasing decision, visit our Plans and Pricing page to learn more.
Related posts
Docusign IAM is the agreement platform your business needs

