From the Trenches: Get a Room(s)
Learn in this detailed walkthrough how use the Rooms API to create a Docusign Room for your real estate transactions.
Table of contents

As a developer working in the real estate space, you may already be familiar with Docusign Rooms. If you weren’t already aware, late in 2020 Docusign released its first set of SDKs dedicated specifically to the Rooms API. In this From the Trenches, I'll give you a rundown of a few of the involved components and endpoints to give you a jumpstart in getting your Rooms integration online.
If you’re curious about the setup steps or how to go about getting started, our friends over in Developer Content have an in-depth guide on basic Rooms concepts along with features, setup, and how-to guides with code examples. For this piece, I’ve already set up and preconfigured my account for accessing the Rooms v2 API, so I’ll be proceeding from there, similarly to our how-to for Create Room With Data with a few extra tweaks. If you're completely starting from scratch, you can request a Rooms developer account.
The two elements you’ll need before creating the room are available offices and available roles. To get them, reference /v2/accounts/{accountGUID}, which is the targetURI for your Rooms account:
1. Retrieve a list of roles: GET /v2/accounts/{accountGUID}/roles
GET: https://demo.rooms.docusign.com/restapi/v2/accounts/c894fd66-xxxx-xxxx-xxxx-f843da705f54/roles
Response:
{
    "roles":  [
                  {
                      "roleId":  299913,
                      "name":  "Default Admin",
                      "isDefaultForAdmin":  true,
                      "isExternal":  false,
                      "createdDate":  "2019-07-31T17:13:29.697"
                  },
                  {
                      ...
                  }
              ],
    "resultSetSize":  2,
    "startPosition":  0,
    "endPosition":  1
}
2. Retrieve a list of offices: GET /v2/accounts/{accountGUID}/offices
GET: https://demo.rooms.docusign.com/restapi/v2/accounts/c894fd66-xxxx-xxxx-xxxx-f843da705f54/offices
Response:
{
    "officeSummaries":  [
                            {
                                "officeId":  11860,
                                "name":  "Default Office",
                                "address1":  "123 Main Street",
                                "city":  "Seattle",
                                "stateId":  "US-WA",
                                "postalCode":  "60560",
                                "countryId":  "US",
                                "timeZoneId":  "central",
                                "phone":  "",
                                "createdDate":  "2019-07-31T17:13:29.477"
                            },
                            {
                                ...
                            }
                        ],
    "resultSetSize":  2,
    "startPosition":  0,
    "endPosition":  1
}
Now that you have the two required elements, start by looking at the structure of the payload you want to build. One of the tricky things about working with rooms created with data is getting the data elements correctly structured. In the background, each account can have its own set of available field data. This means that you need to provide the elements in a "header", "key" format, supplying values for the elements available to your account. As these elements can vary, unfortunately our SDKs cannot provide you with a pre-populated list.
However, what I can do is show you how to view the structure of these elements using an existing Room. Log into the Docusign Rooms website and set up a sample transaction room. Once you have the fields populated, you’ll notice that the room has a specific ID. If you save that Room, then request the field data, it should come back looking something like this.
Note: the Rooms API returns available fields that have not been filled as null.
Response:
{
    "data":  {
                 "listingDate":  "2021-02-27T00:00:00Z",
                 ...
                 "listingExpirationDate":  "2021-03-31T00:00:00Z",
                 "buyerAgent2":  {
                                     "cellPhone":  null,
                                     ...
                                     "businessPhone":  null
                                 },
                 "localContractAmount":  null,
                 "seller1":  {
                                 "address1":  "999 3rd Ave",
                                 ...
                                 "state":  "US-WA"
                             },
                 "loanContingencyDate":  null,
                ...
                 "currentListingAmount":  150000000000,
                 "buyerAgent1":  {
                                     "businessPhone":  null,
                                     ...
                                     "email":  null
                                 },
                 "companyAddress2":  null,
                 ...
                 "deedSentToSellerDate":  null,
                 "buyer1":  {
                                "address2":  null,
                                ...
                                "state":  null
                            },
                 "offerDate":  null,
                 ...
                 "listSideCommission":  null,
                 "listingAgent1":  {
                                       "homePhone":  "123-example-home",
                                       ...
                                       "state":  "US-WA"
                                   },
                 "companyPhone":  null,
                 ...
                 "sellerConcession":  null,
                 "seller2":  {
                                 "state":  null,
                                 ...
                                 "address1":  null
                             },
                 "comments":  "Lorem Ipsum",
                 "prelimSettlementStmtReceivedfromSellerDate":  null,
                 "yearBuilt":  null,
                 "listingAgent2":  {
                                       "address1":  null,
                                       ...
                                       "email":  null
                                   },
                 "lotSizeSquareFeet":  null,
                 ...
                 "state":  "US-WA",
                 "buyer2":  {
                                "cellPhone":  null,
                                ...
                                "state":  null
                            },
                 "specialCircumstances":  null,
                 ...
                 "buyersPremium":  null
             }
}
You may have noticed that when you’re trying to add certain elements like buying agent or listing agent information, it does not appear to get added. That’s because these elements require their own separate objects, which may be easier to show you.
Today I’ll be working with our Java Code Example Launcher, which now supports the Rooms and Click APIs. While you can download it from Github, I would recommend using the Quickstart versions; they have been designed to preconfigure the majority of the launcher’s setup requirements so you can focus on the coding portion.
Now, let’s say I’d like to create a room with data and provide a few elements about one of the buyers like their name and company.
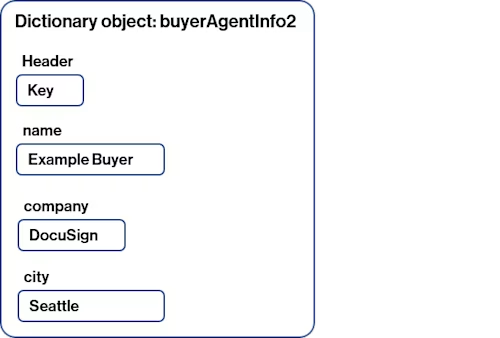
First, I’ll need to prep the three objects I’ll need to supply buyer agent information for the Room. For flow and simplicity’s sake, it’s easiest to start with the buyer information first, move to the remaining field data, then add the culmination of said data to the top-level object.
SDK objects:

In Java:
FieldDataForCreate buyerAgent2Info = new FieldDataForCreate()
		   .putDataItem("company", "Docusign")
		   .putDataItem("name", "Example Buyer")
		   .putDataItem("city", "Seattle");
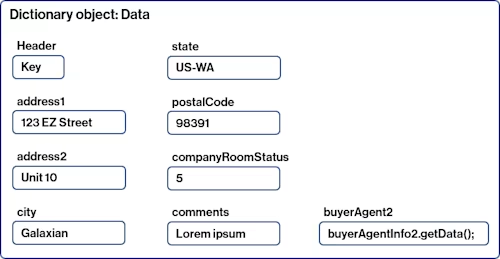
Next, I’ll create another object and add the top-level parameters for field data. Notice at the end that the key supplied for buyerAgent2 is directly referencing the data from the object created above.
SDK objects:

In Java:
FieldDataForCreate baseRoom = new FieldDataForCreate()
    .putDataItem("address1", "123 EZ Street")
    .putDataItem("address2", "unit 10")
    .putDataItem("city", "Galaxian")
    .putDataItem("state", "US-WA")
    .putDataItem("postalCode", "98391")
    .putDataItem("companyRoomStatus", "5")
    .putDataItem("comments", "Lorem ipsum.")
    .putDataItem("buyerAgent2", buyerAgentInfo2.getData());
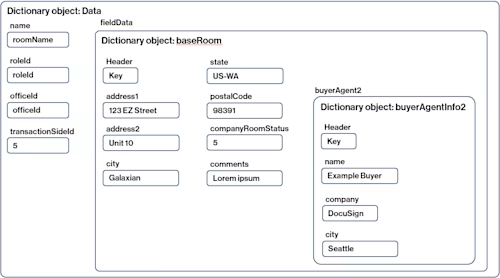
Third, I create the object to house the required information for creating the Room: Name, roleId, an optional officeId, and the additional elements for buyerAgent2. I presented earlier in this post the calls to retrieve officeIds and roleIds.
Note: If an officeId is not supplied, the call will not fail; it will be assigned to your default office.
SDK objects:

In Java:
...
return new RoomForCreate() {
    .name(roomName)
    .roleId(roleId)
    .officeId(officeId)
    .transactionSideId("listbuy")
    .fieldData( baseRoom );
}
Last, and to tie these points together, the Docusign SDK then takes these objects and forms them into a JSON payload that is used to create a room. The overall structure of the payload should look like this:
{
    "name": "Sample Room #137",
    "roleId": "299913",
    "transactionSideId": "listbuy",
    "fieldData": {
        "comments": "Lorem ipsum.",
        "address2": "unit 10",
        "city": "Galaxian",
        "address1": "123 EZ Street",
        "postalCode": "98391",
        "buyerAgent2": {
            "city": "Seattle",
            "name": "Example Buyer",
            "company": "Docusign"
        },
        "state": "US-WA",
        "companyRoomStatus": "5"
    }
}
Additional resources

Matt King is a senior member of the Developer Support team and has been with Docusign for about 5 years. He specializes in assisting customers with our various APIs, SDKs, and code examples.
Docusign IAM is the agreement platform your business needs


