
Docusign for Salesforce: How to Create a Lookup Relationship Between Docusign Status and Salesforce Objects
Learn how to create a lookup relationship between the Docusign Status object and the Salesforce objects in Salesforce.
Table of contents

Welcome to the all new Docusign for Salesforce blog series! In this series, I will be sharing some tips and tricks that I’ve learned over the past decade while working with and assisting hundreds of customers implement Docusign with Salesforce.
Today’s article is focused on the Docusign Apps Launcher: eSignature for Salesforce integration.
I’m going to show you how to enhance your Docusign eSignature for Salesforce implementation to make it easier to get the Docusign Status information you’re looking for whenever you need to setup a Salesforce report, dashboard or list view, regardless if you’re sending Envelopes from standard or custom objects.
Most companies that leverage the Docusign eSignature for Salesforce integration to send Envelope transactions need the ability to easily track and manage them directly from Salesforce, while also being able to see other meaningful related data, such as which object record an Envelope originated from. For example, if you’re sending Envelopes from the Opportunity object, you might want to run a Salesforce report that displays information about Docusign Status records, but you also need to see the related Opportunity name, ID, amount, Account name, and so on.
Before we jump into the solution, I’d like to provide some context first.
Please note: If you’re already using the Docusign Apps Launcher version 5.2 or higher, and if you’re only sending Envelopes from standard Salesforce objects (Accounts, Opps, Leads, Contacts, Contracts, Cases), then you may not need to employ the solution found in this article. However, if you’re sending Envelopes from custom Salesforce objects, or if you’re on an earlier version of DAL (pre-5.2), then this guidance is absolutely applicable still.
What is Docusign Status?
Docusign Status is a custom object that comes standard with the Docusign Apps Launcher: eSignature for Salesforce managed package. Docusign Status tracks the status of envelopes sent through Docusign. By default, when a user sends an envelope from a Salesforce object record (such as an Account record, for example), a Docusign Status record is automatically created to track the envelope's status.
How are Status records used?
In addition to the Docusign Status object records, the integration also includes a “Docusign Envelope Status” Lightning Component that you can add to Salesforce page layouts that enables users to track and manage Envelopes directly from Salesforce records. If a user is looking at a Salesforce record that an Envelope was sent from, the component will display Docusign Status information about those Envelopes. It’s an excellent feature built into the application to simplify a user’s ability to track envelopes in a contextual manner.
Can I set up a Salesforce report for the Docusign Status object and see the related data I need?
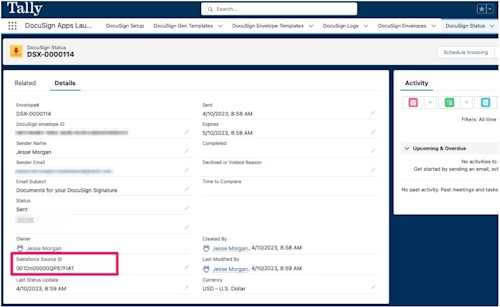
By default, the Status record is not directly linked to the source object record that the Envelope was sent from. Instead, the Status record contains a single “Salesforce Source ID” field that contains the Salesforce object record ID value of the source record the Envelope originated from. This means that setting up a Salesforce report for the Docusign Status will only display information about the Status records themselves, but not any relevant information about the source object records you want additional information for.
The great news is that this can be easily addressed by creating a lookup relationship between the Docusign Status object and the source object(s) users are sending Envelopes from.
(Example: This Status record was created when an Envelope was sent from the Account object.)
Why create a lookup relationship?
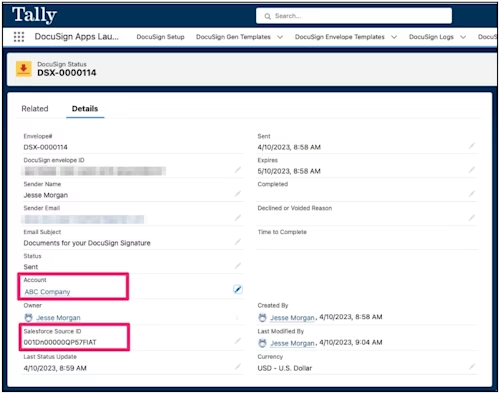
Creating a lookup relationship between Docusign Status and your source object(s) creates a linked relationship that provides you with the ability to run reports and now see information related to both the Status and the source object record. This will improve your ability to also create meaningful dashboards and list views, or add the Status as a related list on your objects instead of using a component.
(Example: Creating a lookup field on the Docusign Status as a lookup to your source object(s) enables you to see which source record the Status record was sent from and is now related to.)
The setup:
Let’s walk through the steps to meet all of the requirements outlined above. At a high-level, we’re going to accomplish this by creating a lookup relationship between the Docusign Status object and the Salesforce object(s) that your users are sending eSignature Envelope transactions from. We’re then going to create a Salesforce Flow that’ll be used to perform the background logic and tasks to link everything up.
Step 1: Creating lookup fields on the Docusign Status object
To create a lookup relationship between the Docusign Status object and the source Salesforce objects, you will need to create a lookup field on the Docusign Status object. This lookup field will allow you to link the Docusign Status record to the source Salesforce object record. Follow these steps to create a lookup field on the Docusign Status object:
Go to Setup in Salesforce.
Go to Object Manager
Locate and click on the “Docusign Status” object
Click on “Fields & Relationships”
(FYI: You’ll need to repeat the next remaining steps for each Salesforce object you intend on sending Docusign Envelopes from.)
Click the “New” button
Data Type: Select the “Lookup Relationship” field option
Related To: Select the object you send from (e.g. Account, Opportunity, a custom object, etc.)
Field Label: Apply a field Label, which should be the name of the object you’re sending from.
Child Relationship Name: Can remain the same name as the default you assigned above, or could be something different, such as “Sent Envelopes List”.
Set visibility as per your own requirements
Add field to all relevant Page Layouts
Save
Result: You should now see the lookup field on a Docusign Status record page layout, and you should also see the related list on the source object page layout.
Step 2: Creating a Salesforce Flow
After creating the lookup field on the Docusign Status object, you will need to create a Salesforce Flow that’s job is to: 1. Analyze the 3 character prefix of the Salesforce Source ID to determine which object the Envelope was sent from, and 2. copy the full Salesforce Source ID value to the appropriate object lookup field.
Whether you’re sending Envelopes from only one object today, or if you intend on sending Envelopes from many objects, the solution below accommodates for one or mony objects, with growth to expand later on if you ever anticipate needing to add-on additional objects.
Please note: This approach is leveraging a Salesforce Flow instead of an Apex trigger. Salesforce Flows are an easy no-code solution to accomplish what we need, but you may certainly use an Apex Trigger to do this instead if you prefer. Whether you use Flow or an Apex trigger, the task is the same: We need to determine the source object, then copy the Salesforce Source ID value to the respective object lookup field(s). Which approach you take (Flow vs. Apex) is entirely up to you.
Follow these steps to set up a Salesforce Flow to populate the lookup field(s) created in Step 1 with the record ID from your source object(s).
2A: Create New Flow
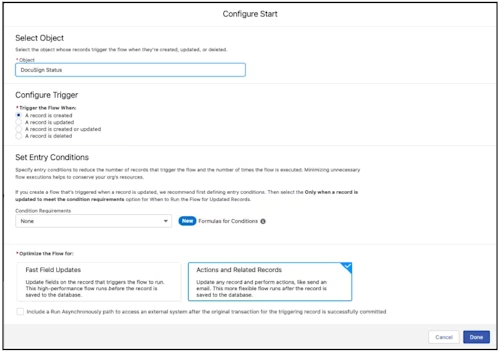
Salesforce > Setup > Process Automation > Flow > New Flow
Flow Type: Record-Triggered Flow
Object: Docusign Status
Trigger the Flow When: A record is created
Condition Requirements: None
Optimize the Flow for: Actions and Related Records
Done.
2B: Create a New Resource
Select “New Resource” from the left hand side of Flow Builder
Resource Type: Formula
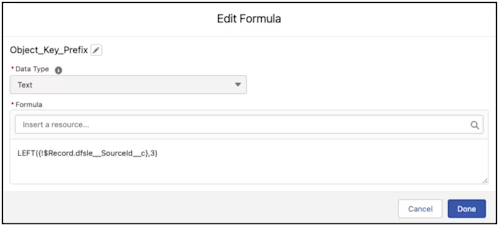
API Name: Object_Key_Prefix (or whatever you prefer. Note that this will be referenced later.)
Data Type: Text
Formula: LEFT({!$Record.dfsle__SourceId__c},3)
The Formula needs to pull in the source record ID value and truncate it so that only the first 3 characters of that value are produced.
This is needed because the 3 character prefix of any Salesforce record ID is the indicator to know what Salesforce object that record was created from. For example: 001 is always an Account object record, 006 is always an Opportunity object record, 00Q is always a Lead object record, and so on. (Documentation: Learn How Object Key Prefixes Identify the Salesforce Object From Which Your Envelope Was Sent)
This 3 character value is crucial for the “Decision” step below.=
2C: Create a Decision Step
The Decision step should be used regardless if you’re sending from one object or many, as it’ll give you the flexibility to add on additional decision criteria later if your organization chooses at a later point to start sending envelopes from additional objects. The purpose of this Decision step is to assess which object the envelope was sent from so that it knows which lookup field on the Docusign Status to update with the record ID.
In Flow Builder select (+) > Add Element > Decision
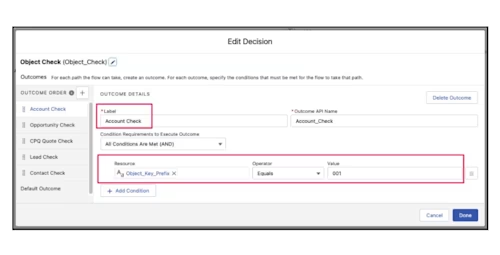
Label: Object_Check
For each object you are intending to send envelopes from, you will need to create a new Outcome using the [+] button
Each outcome will check a specific object to determine if the envelope was sent from it or not
The Label should reference the object you are trying to determine if the envelope originated from.
The Resource should be the name (label) of the Formula field you just completed in the previous step.
The Operator needs to be “Equals”
The Value needs to be the 3 character value of the source object you’re wanting to update. (e.g. 006 for Opportunity, 001 for Account)
Example if your resource label was “Object_Key_Prefix” & the Object was an Account:
2D: Create an Update Records Step
For each outcome, you’ll now add some additional steps, such as updating the Docusign Status record lookup field, End the process, or do something else.
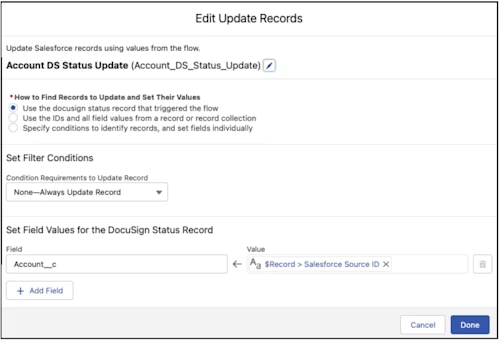
The “Update Records” step is to update the Docusign Status lookup field with the record ID.
In Flow Builder, for a decision tree flow, select (+) > Add Element > Update Records
Label: {YourObject} DS Status Update
How to Find Records: Use the docusign status record that triggered the flow
Field: The Field Name of the Lookup Field created in Step 1
Value: Type $Record, then select Salesforce Source ID
Done
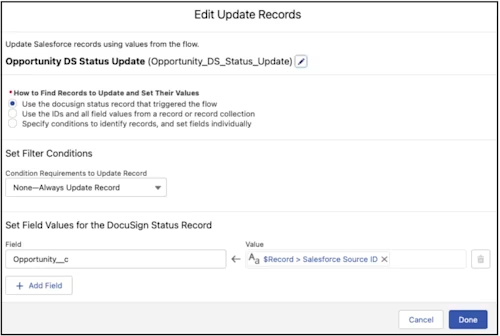
Repeat the above by adding an “Update Records” step for every “Outcome” you added to the “Decision” tree.
Example of the Update Records configuration step if the object was Account:
Example if Opportunity:
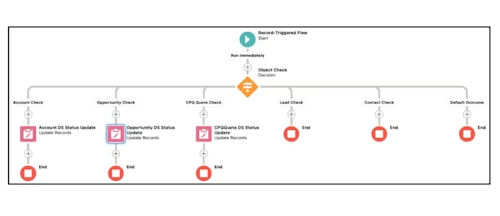
Overall Flow on Completion
Your Flow should now look similar to the example image below. Depending on how many objects you set up in your Decision tree, yours may look smaller or larger.
(Note: The example diagram below is showcasing the desire to only update lookup fields if the envelope was sent from either Account, Opportunity, or CPQ Quote, and to ignore and do nothing if it’s for Lead or Contact, because my use case is anticipating future needs but not quite ready to send from those objects yet. Obviously yours will vary a bit depending on the types of objects you’re sending Envelopes from today, versus objects that you might anticipate sending Envelopes from in the future.)
(Optional) Step 3: Add the Docusign Status as a related list on the source object(s)
This is an optional step. If you’d prefer to have users view Status as a related list on the object page layout rather than through a Lightning component, follow these steps:
Go to Setup in Salesforce.
Go to Object Manager
Locate and click on the object(s) you want to place the Docusign Status related list on
Click the object name
Click on “Page Layouts”
(FYI: You’ll need to repeat the next remaining steps for each layout you’d like to place the related list on.)
Click on the page layout you need to modify.
(The enhanced page layout editor should now be displayed. This view is split into two parts: a palette on the upper portion of the screen and the page layout on the lower portion of the screen. The palette contains the user interface elements that you can add to your page layout, such as fields, actions, buttons, links, and related lists. Salesforce documentation.)
From the palette at the top of the screen, select “Related Lists”, then click and hold the “Docusign Status” and drag it downard to place it somewhere on your page.
Save.
Final step: Validate the solution
With these steps in place, the flow will automatically link the Docusign Status record with the appropriate Account or Opportunity object record whenever an envelope transaction is sent, allowing for more accurate and efficient reporting within Salesforce.
Now that you’ve created the lookup field(s) and set up a Flow, it’s time to test the solution.
You’ll want to repeat all of the steps for each object you’ve set up to send Envelopes from.
Navigate to the Salesforce object
Send a Docusign Envelope
Wait a few seconds, then refresh the record page in your browser.
Check the Envelope Status Component on the page layout. You should see the default behavior of seeing the Envelope you sent displayed within the component. (Optional) If you added the Docusign Status as a related list to your source object(s), ensure you also check that this has also been populated with the Envelope you just sent.
Navigate to the Docusign Status object, click on the Envelope ID. You should see the related object record listed in the respective lookup field. You should also be able to click on the lookup link.
Create a Salesforce report for the Docusign Status object. You should be able to select details from the Docusign Status object, as well as be able to add columns and data for any of the related objects. Examples include: Opportunity name, Opportunity amount, Account name, etc. The additional data you’ll be able to add will depend solely on the objects you created lookup relationships for.
The results
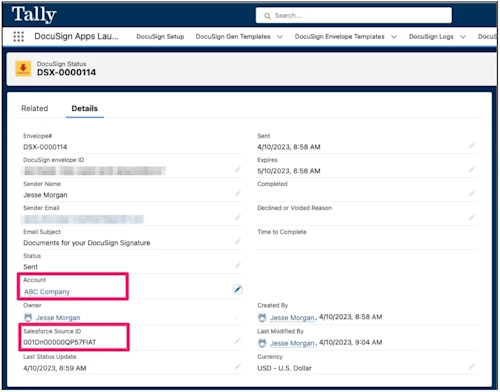
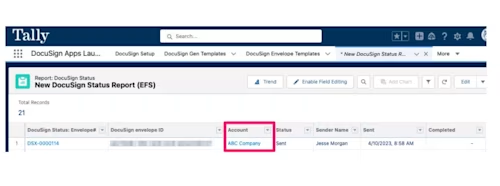
After following all of the steps above, I’m now able to see the source record that the Envelope was sent from while looking at the Status record, run a report for the Docusign Status object and see more granular details about an envelope to see which object record it originated from, and also view the Docusign Status as a related list on the page layout of my source object.
Status record: Displays the Account name that my Envelope was sent from.
Salesforce report: Shows the account record that the Envelope originated from.
Object page layout: The Docusign Status is now visible as a related list on the Account page layout, which can be very helpful for any users that are unable to see Lightning components because they’re still using the Salesforce Classic layout.

Summary
In conclusion, creating a lookup relationship between the Docusign Status object and your source objects in Salesforce can greatly improve reporting accuracy and efficiency for Docusign Envelope transactions. By automating this process through a Salesforce Flow, you can streamline tracking and reporting, and provide a better experience for your users.
Additional resources

Jesse Morgan is a Principal Demo Architect within the Docusign Solution Consulting group, formerly a Senior Product Consultant in the Docusign Global Professional Services organization. He enjoys applying his years of deep product and industry knowledge and experience working with a vast array of Docusign products and services to provide customers with creative solutions to solve complex problems.
Related posts
Docusign IAM is the agreement platform your business needs


