
Clickety Click Click: Testing your clickwraps
Discover the new Clickwrap Tester and learn how to use it to test your clickwraps.

By now you likely have heard of Docusign Click, which was released in April 2019. In case you haven’t, Docusign Click is our product that lets you capture consent to simple agreements (such as terms and conditions, license agreements, and more) with a single click. As you may expect, Docusign Click uses our eSignature technology to manage the agreements, display them on your web site, and record the agreement consent by each user. Therefore, you can expect the same level of trust and security as with every product we produce.
To better understand what Docusign Click does, suppose you have a Terms of Use agreement for your web site that you want every user to accept before they gain access. We’ve all experienced this type of functionality in apps and websites. These types of agreements, known as clickwraps, don’t have any fields for the user to enter data, so it is important that the technology be able to store which users accept the agreements and to be able to report on that.
Now that you know what Docusign Click is and you are now familiar with the concept of a clickwrap, you’ll start to notice them absolutely everywhere. For example, when you use an automated kiosk to check in for your flight at an airport, you are presented with a screen to confirm you agree with the airline policies. You only have to click an “I Agree” (or something similar) button at the bottom of the screen verifying you have no harmful substances or devices before you can print a boarding pass. You don’t enter any information and you don’t sign the agreement; you simply have to accept or consent to it. That’s a clickwrap! I remember when we first launched Docusign Click, I couldn’t stop noticing clickwraps are everywhere! They have been for a long time, I just never really noticed them before. I felt like I was in an alternate ending for The Sixth Sense (see how many of you get that reference - LOL).
When configuring your clickwraps, you have several choices to make, including (but not limited to):
What agreement (including text and graphics) will you present to users?
If your agreement changes, do you want users to be forced to accept the new agreement, or only those who have never accepted the agreement?
Do you want to enforce that users read the agreement (or at least be forced to scroll to the bottom) before consenting?
Other parameters, such as the text on the acknowledgement button, and a few other things.
In this blog post, I don’t reinvent the wheel by showing you how to create your clickwraps, but you can read all about that in the Docusign Click User Guide. However, wouldn’t it be nice to be able to test your clickwrap’s functionality before you deploy it on your website or app? Read on to learn more about our new Clickwrap Tester.
Testing your clickwraps
After you create and activate a clickwrap in the Docusign eSignature UI, we now make it really easy to test them. If you are a software developer who integrates Docusign functionality into your app or website, you are, no doubt, familiar with the Docusign Developer Center. That’s where we now host the Clickwrap Tester too.
Testing your clickwraps couldn’t be any easier. In the screen where you manage your clickwraps, we’ve added a new menu item labeled… wait for it... Test Clickwrap, which looks like this:
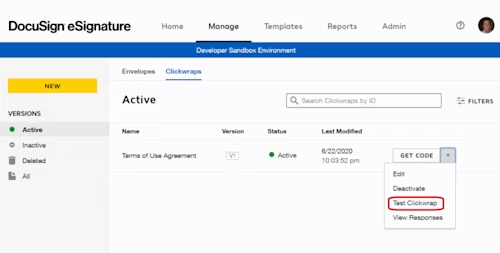
Clicking Test Clickwrap brings up a dialog that lets you copy a URL to the tester for the selected clickwrap, like this
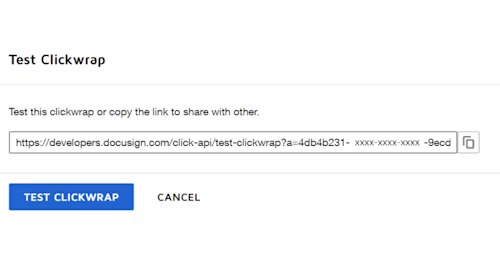
Copying the URL lets you share it with others to verify the functionality before going live with the clickwrap. Alternatively, you can test it yourself by simply clicking TEST CLICKWRAP. Testing the clickwrap requires you to enter a value that uniquely identifies a user to test. This is necessary because Docusign Click stores data on a per-user basis, so you can see what happens if the same user tries to consent to the clickwrap multiple times and even verify the user is prompted to reaccept when you version clickwraps, or test other parameters that you set.
What do you use to uniquely identify users? This is up to you and your implementation details. You may want to use email addresses, employee IDs, or some other identifier that uniquely represents each user. Here’s an example of entering a value of 123456 for a specific user for the given clickwrap:
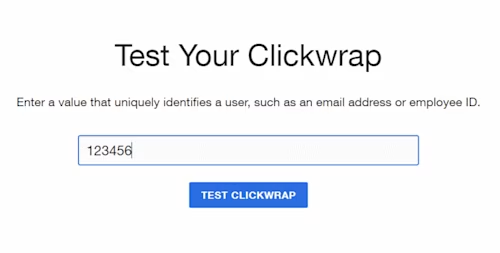
Click the TEST CLICKWRAP button to display the interactive clickwrap, like this:
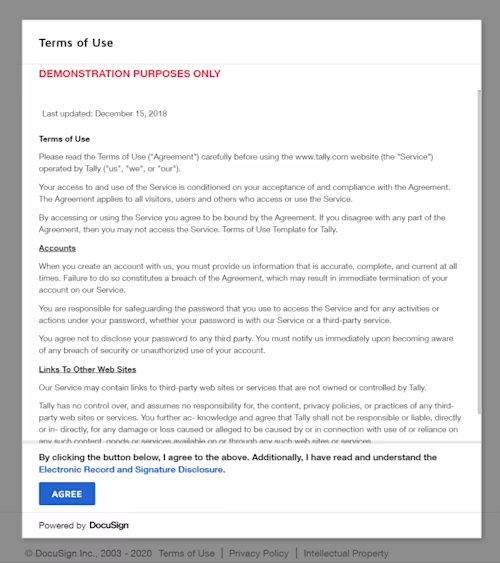
Make sure to test all the functionality and parameters you have configured for your clickwrap. Scroll to the bottom of the agreement, click AGREE (or whatever you decided to name that button when you configured your clickwrap), and even go back into the UI to view the responses to your clickwrap.
Testing worked great - now what?
If you tested your clickwraps in your developer account (with the URL prefixed with https://appdemo.docusign.com/), you simply create your clickwraps in your production account (with the URL prefixed with https://app.docusign.com/) using the same settings. Then you embed a JavaScript into your code using the GET CODE dropdown shown in the first screenshot and paste it into your website code. It looks something like this:
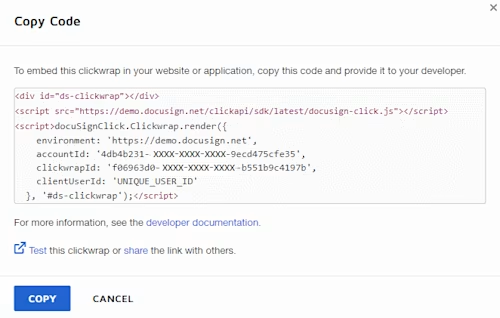
Make sure to modify your code to replace a value that uniquely represents each user (such as an email address, an employee ID, etc.) for UNIQUE_USER_ID and we’ll take care of the rest :-)
Diving deeper into code?
Everything I showed you in this blog post uses the Docusign web UI because it focuses on the Clickwrap Tester, which is also a UI component. However, you can manage your clickwraps and pull data programmatically too. In fact, we have a Click API with lots of content to help you code your Docusign Click integrations.
Additional resources

Tony Mann has been with Docusign since 2016, helping developers integrate Docusign into their apps. He is a published author and an expert SQL developer with a passion for developer education.
Related posts
Docusign IAM is the agreement platform your business needs


