Blog
Home/

Blog Series: Building a CLM–Power Automate custom connector: Example uses

Author Marty Scholes
Marty ScholesManager, ISV Partner Solution Architects
Summary12 min read

This fourth installment in our series on CLM–Power Automate connectors gives you step-by-step instructions for three popular use cases.

    • Introduction
    • Signal a CLM workflow
          • Move CLM document and metadata to SharePoint
              • Move SharePoint document to CLM
                  • Conclusion
                    • Additional resources

                    Table of contents

                    In my most recent post, I promised to show how to use Power Automate custom connectors to perform useful work in the real world. This post shows how to do just that. My original intent was to deliver all of the solutions in a single post,  but I’ve got so many good things to show you that I’ve split this final post into two parts.

                    Introduction

                    In this post, you will develop solutions to do three things that are useful in the real world:

                    1. Signal a CLM workflow from CLM

                    2. Archive CLM documents and metadata to SharePoint

                    3. Move SharePoint documents to CLM

                    Let’s get started by building a solution to Signal a CLM workflow.

                    Signal a CLM workflow

                    This example makes use of the Wait for Signal CLM workflow step, showing how to trigger this step from within a CLM workflow. You are going to build three components:

                    • A new action for the custom connector

                    • A flow that listens for a request, then sends a signal to a CLM workflow

                    • A CLM workflow that demonstrates the operation

                    New action for custom connector

                    First, add a new action to your custom connector. Complete the General card as shown below.
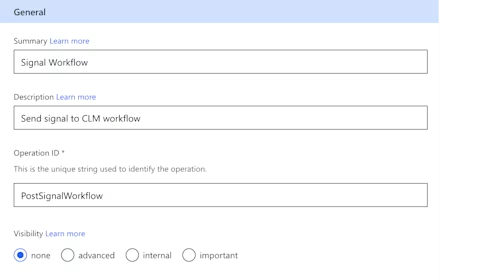
                    Add a new action to your custom connector

                    As before, select + Import from sample to create a request. Enter the values as shown below and then select Continue.

                    Take note of the following values:

                    Verb: POST.

                    URL: https://apiuatna11.springcm.com/v2/{AccountId}/workflows/{WorkflowId}/signal

                    The Body value is below.

                    {
                      "data": "This is the signal message"
                    }


                    Your Import from Sample card should look like this:
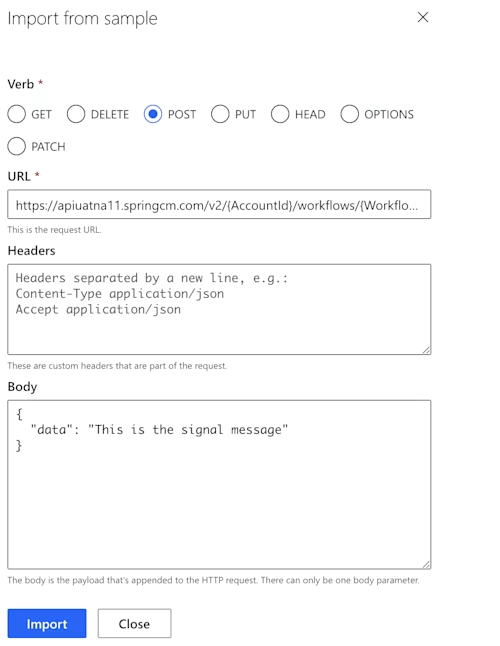
                    Import from Sample card for this connector

                    The resulting request should look like this:
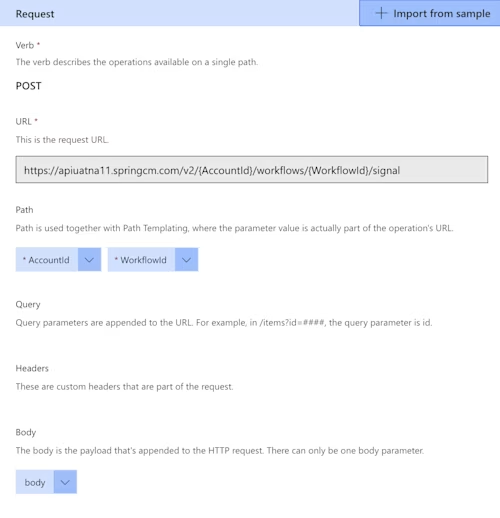
                    The resulting request

                    Select Update Connector to persist the changes. The next step is to build a flow.

                    Flow to signal CLM workflow

                    Next, create a new Power Automate flow by selecting My flows on the left, selecting + New Flow at the top, then selecting Automated cloud flow. Give your flow a name. Because the trigger for this flow is difficult to locate on this panel, select Skip to continue. Under the Built-in section, select the Request trigger as shown.
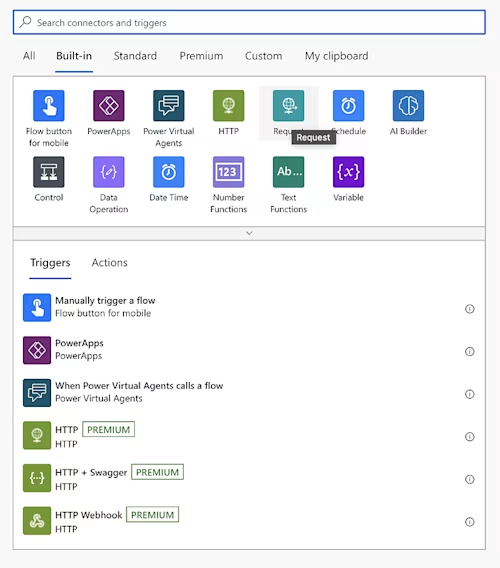
                    Select the Request trigger

                    Select When an HTTP request is received.

                    Select When an HTTP request is received

                    Define the body schema by selecting Use sample payload to generate schema. Paste in the following JSON and then select Done.

                    {
                    	"workflowId": "Workflow GUID goes here",
                    	"data": "This is the message passed to CLM"
                    }


                    You should see a defined trigger similar to that shown below.
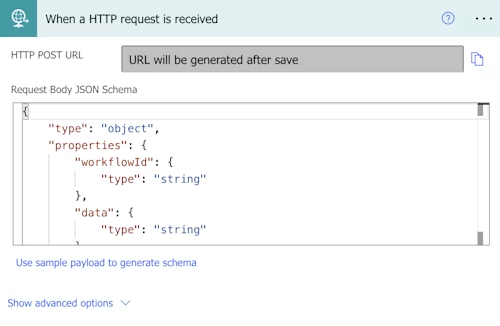
                    Trigger for when a HTTP request is received

                    Select + New Step. Choose your custom connector and the Signal Workflow action you defined.
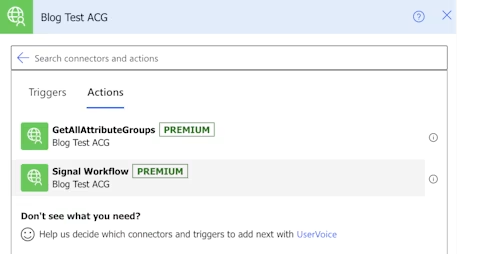
                    Choose your custom connector and the Signal Workflow action you defined

                    Populate the fields. For now, type in your Account ID GUID, visible from Docusign under Settings > Apps and Keys, listed as API Account ID.

                    Populate the two remaining fields with the corresponding dynamic content. The result should look similar to the image below.
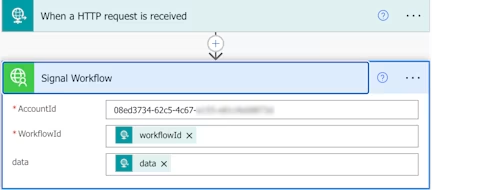
                    Adding the WorkflowId and data fields to the trigger

                    Select Save. Select When a HTTP request is received and then copy the HTTP POST URL. You will need that URL when defining the CLM workflow below. Your flow is complete and should look like the image below. Next, create the CLM workflow.

                    Completed HTTP request trigger

                    CLM workflow

                    Create a CLM workflow that looks like the below image.
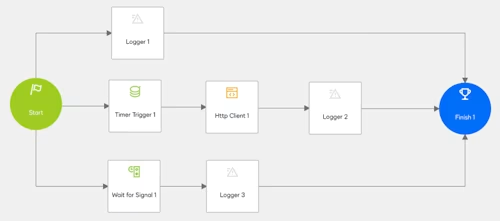
                    Create a CLM workflow like this one

                    For each of the loggers, populate the following messages:

                    • Logger 1: This should finish first

                    • Logger 2: This should finish second

                    • Logger 3: This should finish last

                    Timer Trigger: set a 10-second timeout.

                    Http Client: set the following parameters:

                    Content Expression:

                    string content;
                    
                    content = "{";
                    content += " \"WorkflowId\":";
                    content += " \" ";
                    content += GetVariableValue("");
                    content += " \",";
                    content += "\"Data\": \"Signal from CLM to Power Automate and back to CLM\" }";
                    
                    return content;


                    Method: POST

                    Endpoint URL: Populate this with the HTTP POST URL you copied above when defining the Power Automate flow.

                    Header Name: Content-Type

                    Header Value: application/json

                    Finally, create variables and assign them for the HTTP response, code, and headers. When complete, the workflow step definition should look similar to the following.
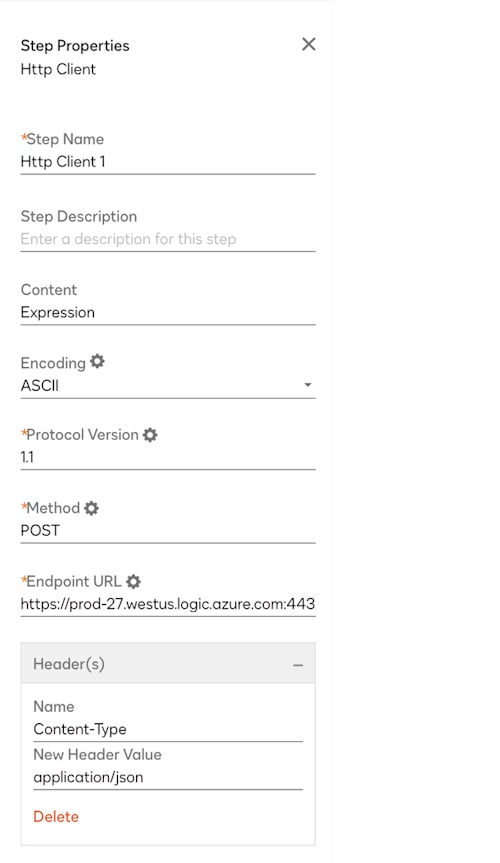
                    Workflow step definition

                    Save and publish the workflow.

                    Next, start the workflow with no parameters or documents. Within a few seconds, the workflow should complete. The sequence of operations is listed below.

                    1. The first branch finishes almost immediately.

                    2. The second branch waits 10 seconds before calling your Power Automate flow and then finishes.

                    3. The third branch waits for a signal from your Power Automate flow, itself triggered by the second branch and then finishes.

                    Caveats

                    Keep in mind the following with regard to this integration:

                    • The Account ID is hardcoded, but ideally should be passed into the flow.

                    • Since there are no restrictions to what process can call this flow, be aware that a malicious process can signal any workflow if it knows the Workflow ID. This isn’t as big a risk as it seems, however: to get the Workflow ID, a malicious process would first need access to the CLM account itself, and that would provide a much larger attack surface than the ability to signal a single workflow.

                    You have created a CLM workflow that signals itself through a Power Automate flow that uses your custom connector. The next section details how to move documents and metadata out of CLM.

                    Move CLM document and metadata to SharePoint

                    This section will show how to move a document and metadata from CLM to SharePoint. You are going to build four components:

                    • A new action for the custom connector to retrieve document attributes

                    • A new custom connector and action to retrieve document contents

                    • A flow that listens for a request and then copies a document and metadata to SharePoint

                    • A CLM workflow that demonstrates the operation

                    New action to retrieve document attributes

                    Add a new action to your existing custom connector for retrieving the document attributes. Complete the General card as shown below.
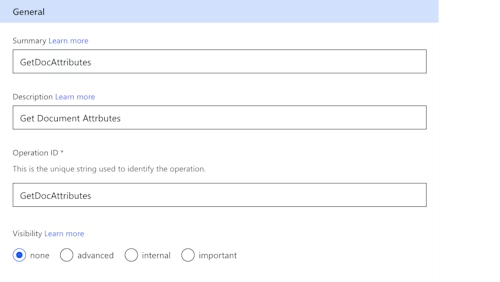
                    Add a new action to your existing custom connector for retrieving the document attributes

                    As before, select + Import from sample to create a request. Enter the values as shown below and then select Continue.

                    Take note of the following values:

                    Verb: GET

                    URL: https://apiuatna11.springcm.com/v2/{AccountId}/documents/{DocId}?expand=AttributeGroups
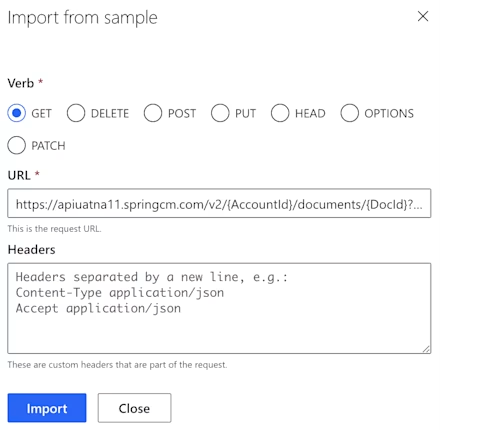
                    Create a request with Import from Sample

                    The resulting request should look like below.
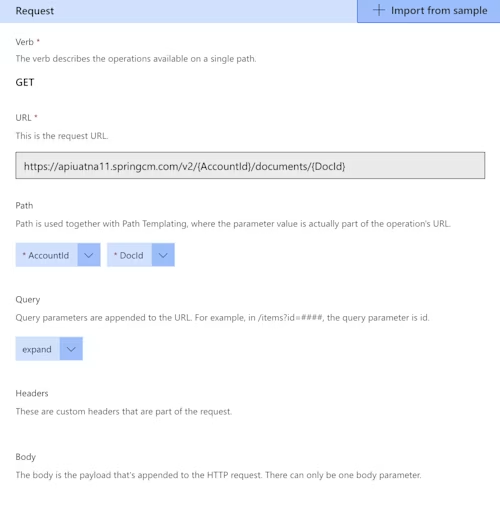
                    Resulting Import from Sample request

                    Select Update Connector to persist the changes.

                    New custom connector and action to retrieve document contents

                    Here you will create a custom connector that connects to a specific host for downloading content. Create a connector as described in my previous post, but substitute the correct download hostname. Your General information card should look similar to the image below.
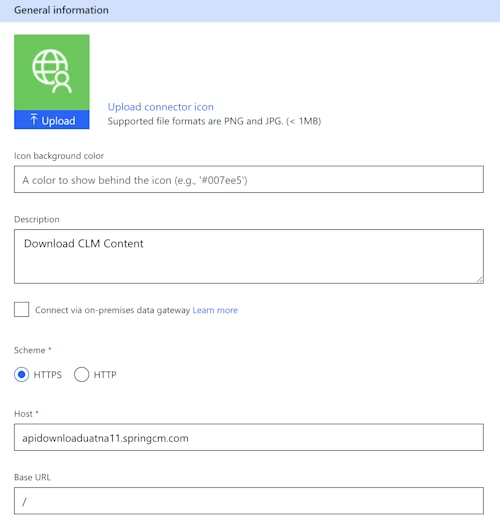
                    General information card for the Download CLM Content connector

                    Complete the Security section in the same way as you did in my previous post. Create a definition for the download operation. The General card should look similar to the following.
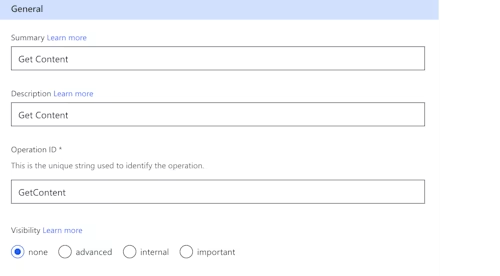
                    Adding summary, description, and operation ID to the General card

                    As before, select + Import from sample to create a request. Enter the values as shown below and then select Continue.

                    Take note of the following values.

                    Verb: GET

                    URL: https://apidownloaduatna11.springcm.com/v2/{AccountId}/documents/{DocId}
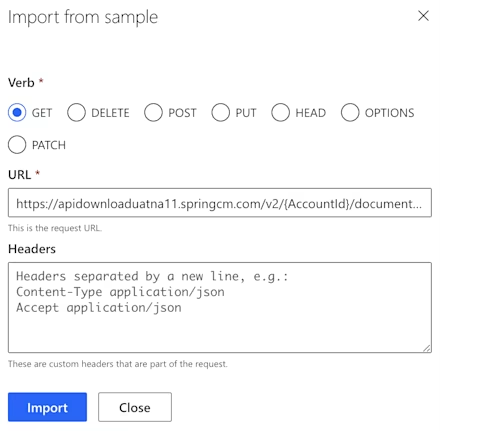
                    Select + Import from sample to create a request

                    Select Create connector. Under the Test tab, select + Create new connection to authenticate with Docusign. If you want this connection to persist, create a Heartbeat flow that uses the connection regularly, as described in my previous post.

                    Now you have the connectors configured to interact with CLM. The next step is to create a Power Automate flow.

                    Flow that listens for a request and then copies a document and metadata to SharePoint

                    Create a flow that listens for an incoming request and then archives a CLM document and metadata into SharePoint. Start with an HTTP request step as you did in the Signal CLM Workflow section. Use the following sample payload.

                    {
                    	"DocId": "Document GUID goes here"
                    }


                    Your workflow step should look like this.
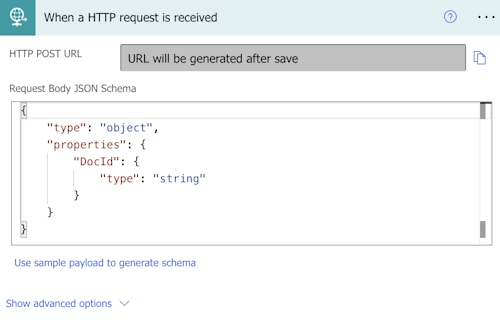
                    Workflow step for when an HTTP request is received

                    Select + New step. Select the Initialize variable step to create an AccountId variable of type String because you will be using the value multiple times in this flow. Populate your AccountId and then select + New step.

                    Populating AccountId and DocID from dynamic content

                    Select the custom connector with the general hostname and then the GetDocAttributes action. Populate AccountId and DocId with Dynamic content. Populate the expand field with “AttributeGroups” and then select Save. Your step should look like this.

                    Select + New step and choose a Parse JSON step. For the Content field, select body from Dynamic content.

                    Next, provide a schema definition. You can obtain the schema by running the GetDocAttributes operation from Postman or another API client using the Docusign Postman collection or your own request, and then pasting that response into the dialog box presented when you select Generate from sample. The schema resulting from the Generate from sample operation is presented below if you would prefer to copy and paste from this post.

                    If you chose not to select Generate from sample, paste the following JSON into the Schema field.

                    {
                       "type": "object",
                       "properties": {
                           "Name": {
                               "type": "string"
                           },
                           "CreatedDate": {
                               "type": "string"
                           },
                           "CreatedBy": {
                               "type": "string"
                           },
                           "UpdatedDate": {
                               "type": "string"
                           },
                           "UpdatedBy": {
                               "type": "string"
                           },
                           "Description": {
                               "type": "string"
                           },
                           "ParentFolder": {
                               "type": "object",
                               "properties": {
                                   "Href": {
                                       "type": "string"
                                   }
                               }
                           },
                           "HistoryItems": {
                               "type": "object",
                               "properties": {
                                   "Href": {
                                       "type": "string"
                                   }
                               }
                           },
                           "AttributeGroups": {
                               "type": "object",
                               "properties": {
                                   "CLM Agreement Details": {
                                       "type": "object",
                                       "properties": {
                                           "Agreement ID": {
                                               "type": "object",
                                               "properties": {
                                                   "AttributeType": {
                                                       "type": "string"
                                                   },
                                                   "RepeatingAttribute": {
                                                       "type": "boolean"
                                                   },
                                                   "Value": {
                                                       "type": "string"
                                                   }
                                               }
                                           },
                                           "Effective Date": {
                                               "type": "object",
                                               "properties": {
                                                   "AttributeType": {
                                                       "type": "string"
                                                   },
                                                   "RepeatingAttribute": {
                                                       "type": "boolean"
                                                   },
                                                   "Value": {
                                                       "type": "string"
                                                   }
                                               }
                                           },
                                           "Expiration Date": {
                                               "type": "object",
                                               "properties": {
                                                   "AttributeType": {
                                                       "type": "string"
                                                   },
                                                   "RepeatingAttribute": {
                                                       "type": "boolean"
                                                   },
                                                   "Value": {
                                                       "type": "string"
                                                   }
                                               }
                                           },
                                           "Name": {
                                               "type": "object",
                                               "properties": {
                                                   "AttributeType": {
                                                       "type": "string"
                                                   },
                                                   "RepeatingAttribute": {
                                                       "type": "boolean"
                                                   },
                                                   "Value": {
                                                       "type": "string"
                                                   }
                                               }
                                           },
                                           "Party ID": {
                                               "type": "object",
                                               "properties": {
                                                   "AttributeType": {
                                                       "type": "string"
                                                   },
                                                   "RepeatingAttribute": {
                                                       "type": "boolean"
                                                   },
                                                   "Value": {
                                                       "type": "string"
                                                   }
                                               }
                                           },
                                           "Party Name": {
                                               "type": "object",
                                               "properties": {
                                                   "AttributeType": {
                                                       "type": "string"
                                                   },
                                                   "RepeatingAttribute": {
                                                       "type": "boolean"
                                                   },
                                                   "Value": {
                                                       "type": "string"
                                                   }
                                               }
                                           },
                                           "Type": {
                                               "type": "object",
                                               "properties": {
                                                   "AttributeType": {
                                                       "type": "string"
                                                   },
                                                   "RepeatingAttribute": {
                                                       "type": "boolean"
                                                   },
                                                   "Value": {
                                                       "type": "string"
                                                   }
                                               }
                                           }
                                       }
                                   },
                                   "CLM Party": {
                                       "type": "object",
                                       "properties": {
                                           "Party ID": {
                                               "type": "object",
                                               "properties": {
                                                   "AttributeType": {
                                                       "type": "string"
                                                   },
                                                   "RepeatingAttribute": {
                                                       "type": "boolean"
                                                   },
                                                   "Value": {
                                                       "type": "string"
                                                   }
                                               }
                                           }
                                       }
                                   }
                               }
                           },
                           "AccessLevel": {
                               "type": "object",
                               "properties": {
                                   "See": {
                                       "type": "boolean"
                                   },
                                   "Read": {
                                       "type": "boolean"
                                   },
                                   "Write": {
                                       "type": "boolean"
                                   },
                                   "Move": {
                                       "type": "boolean"
                                   },
                                   "Create": {
                                       "type": "boolean"
                                   },
                                   "SetAccess": {
                                       "type": "boolean"
                                   }
                               }
                           },
                           "PageCount": {
                               "type": "integer"
                           },
                           "Lock": {
                               "type": "object",
                               "properties": {
                                   "Href": {
                                       "type": "string"
                                   }
                               }
                           },
                           "PreviewUrl": {
                               "type": "string"
                           },
                           "Versions": {
                               "type": "object",
                               "properties": {
                                   "Href": {
                                       "type": "string"
                                   }
                               }
                           },
                           "ShareLinks": {
                               "type": "object",
                               "properties": {
                                   "Href": {
                                       "type": "string"
                                   }
                               }
                           },
                           "DocumentProcessTrackingActivities": {
                               "type": "object",
                               "properties": {
                                   "Href": {
                                       "type": "string"
                                   }
                               }
                           },
                           "DocumentReminders": {
                               "type": "object",
                               "properties": {
                                   "Href": {
                                       "type": "string"
                                   }
                               }
                           },
                           "RelatedDocuments": {
                               "type": "object",
                               "properties": {
                                   "Href": {
                                       "type": "string"
                                   }
                               }
                           },
                           "WorkItems": {
                               "type": "object",
                               "properties": {
                                   "Href": {
                                       "type": "string"
                                   }
                               }
                           },
                           "DownloadDocumentHref": {
                               "type": "string"
                           },
                           "Uid": {
                               "type": "string"
                           },
                           "NativeFileSize": {
                               "type": "integer"
                           },
                           "PdfFileSize": {
                               "type": "integer"
                           },
                           "ContentCreatedDate": {
                               "type": "string"
                           },
                           "Href": {
                               "type": "string"
                           }
                       }
                    }


                    The Parse JSON step should look like this:
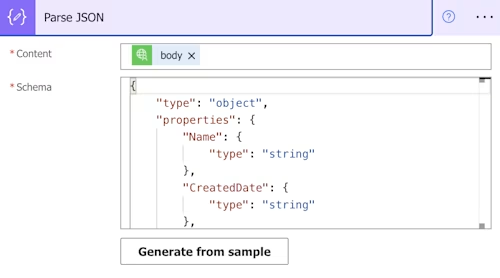
                    The Parse JSON step content and schema

                    Select + New step and choose your Get Content action. Select the AccountId variable and the DocId content from the Dynamic content. Your step should look like this:

                    Get Content step: Populating AccountId and DocId dynamically

                    Now the flow has the content and metadata. The final two steps will create files in SharePoint to store the content and metadata. Select + New step and choose the SharePoint Create File step. When prompted, log into SharePoint. Populate the fields Site Address and Folder Path from your SharePoint installation. Populate the remaining fields from Dynamic content. The Create File step should look like this:
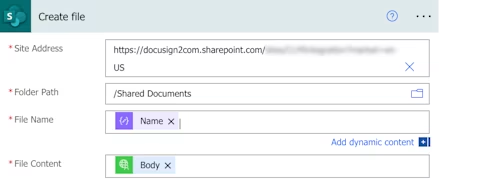
                    Populating the Site Address and Folder Path fields

                    The previous step stored the content. The final step will store the metadata. Select + New step and choose the SharePoint Create File step. Populate the fields Site Address and Folder Path from your SharePoint installation. Populate the remaining fields from Dynamic content. The Create File step should look like this:
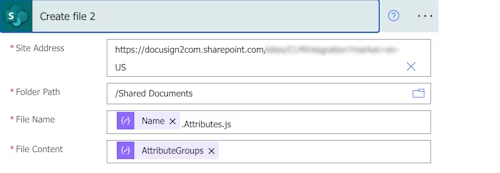
                    Populating fields for the Create File step

                    The flow is complete. Select Save to save the changes. Next, create a CLM workflow to trigger the process to archive the document. The entire flow should look like this.
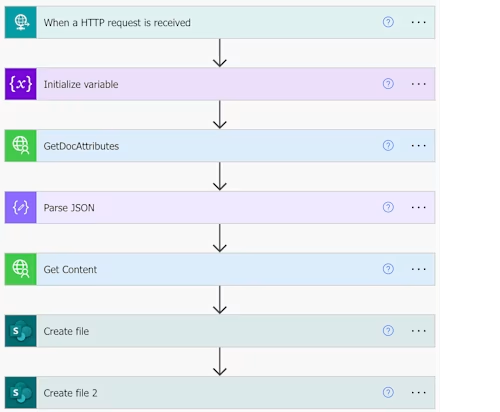
                    The completed workflow

                    CLM workflow

                    Create a CLM workflow that is kicked off with a document and looks like the image below.
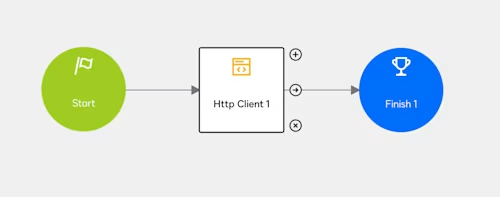
                    The CLM workflow to create

                    For the Http Client, set the following parameters:

                    Content Expression:

                    string content;
                    
                    content = "{";
                    content += " \"DocId\":";
                    content += " \"";
                    content += GetVariableValue("Params.Documents.Document.Id");
                    content += "\" }";
                    
                    return content;


                    Method: POST

                    Endpoint URL: Populate this with the HTTP POST URL you copied above when defining the Power Automate flow.

                    Header Name: Content-Type

                    Header Value: application/json

                    Finally, create variables and assign them for the HTTP response, code, and headers. When complete, the workflow step definition should look similar to the following image.
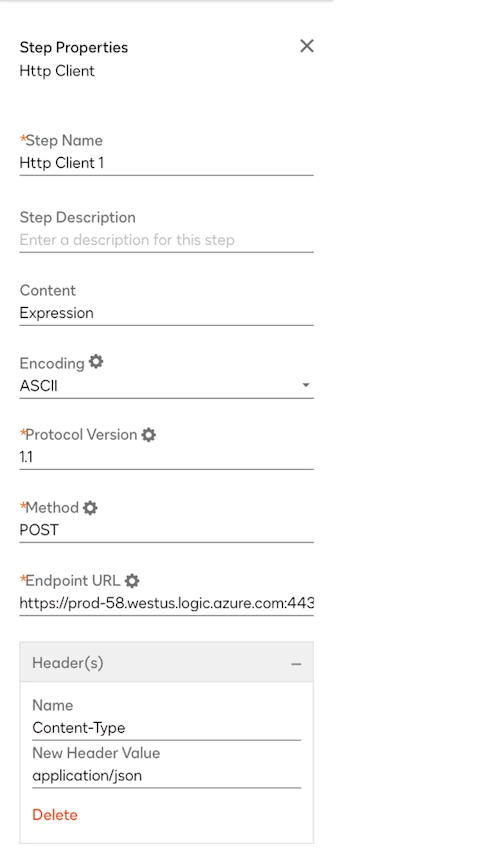
                    CLM workflow step definition for HTTP Client

                    Save and publish the workflow.

                    Next, start the workflow with a document. The workflow will archive the document and metadata to SharePoint.

                    Caveats

                    Keep in mind the following with regard to this integration:

                    • The Account ID is hardcoded but ideally should be passed into the flow.

                    • Since there are no restrictions to what process can call this flow, be aware that a malicious process can archive any CLM document to the SharePoint folder.

                    You have created a CLM workflow that archives any CLM document to a folder in SharePoint. The next section explains how to reverse that operation: moving a SharePoint file into CLM.

                    Move SharePoint document to CLM

                    This section will show how to move a document from CLM to SharePoint. You are going to build three components:

                    • A staging folder in SharePoint

                    • A new custom connector and action to upload document into CLM

                    • A flow that watches for a new SharePoint file then uploads into CLM

                    Staging folder in SharePoint

                    In your SharePoint system, create a folder that watches for new documents. I named mine “Upload to CLM.”

                    New custom connector and action to upload document into CLM

                    Here you will create a custom connector that connects to a specific host for uploading content. Perform the same process as you did to create the download connector, but use the upload hostname, which for me is https://apiuploaduatna11.springcm.com. Your General information card should look similar to the image below.
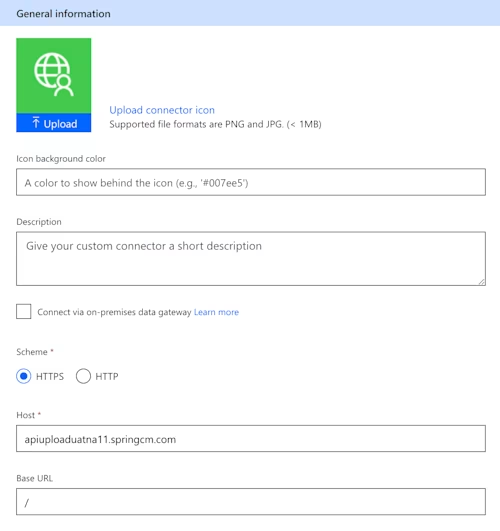
                    General information for new custom connector to upload doc to CLM

                    Create an action similar to the download action you created above. As before, select + Import from sample to create a request. Enter the values as shown below and then select Continue.

                    Take note of the following values:

                    Verb: POST

                    URL: https://apiuploaduatna11.springcm.com/v2/{AccountId}/folders/{FolderId}/documents?name=API_Upload.pdf

                    The body needs to be defined as binary, which takes a little bit of trickery. First, switch to Swagger Editor by toggling the switch in the menu.

                    Next, add the following in the Parameters section.

                            - name: body
                              in: body
                              schema:
                                type: string
                                format: binary


                    When finished, the Parameters section should look like the following.

                    swagger: '2.0'
                    info:
                      title: Blog Test ACG Upload
                      description: ''
                      version: '1.0'
                    host: apiuploaduatna11.springcm.com
                    basePath: /
                    schemes:
                      - https
                    consumes: []
                    produces: []
                    paths:
                      /v2/{AccountId}/folders/{FolderId}/documents:
                        post:
                          responses:
                            default:
                              description: default
                              schema: {}
                          summary: ContentUpload
                          description: Content upload to CLM
                          operationId: ContentUpload
                          parameters:
                            - name: AccountId
                              in: path
                              required: true
                              type: string
                            - name: FolderId
                              in: path
                              required: true
                              type: string
                            - name: name
                              in: query
                              required: false
                              type: string
                            - name: body
                              in: body
                              schema:
                                type: string
                                format: binary
                    definitions: {}
                    parameters: {}
                    responses: {}
                    securityDefinitions:
                      oauth2-auth:
                        type: oauth2
                        flow: accessCode
                        authorizationUrl: https://account-d.docusign.com
                        tokenUrl: https://account-d.docusign.com/oauth/token
                        scopes:
                          impersonation signature spring_read spring_write organization_read user_read account_product_read content: >-
                            impersonation signature spring_read spring_write organization_read
                            user_read account_product_read content
                    security:
                      - oauth2-auth:
                          - >-
                            impersonation signature spring_read spring_write organization_read
                            user_read account_product_read content
                    tags: []


                    The finished request should look like this:
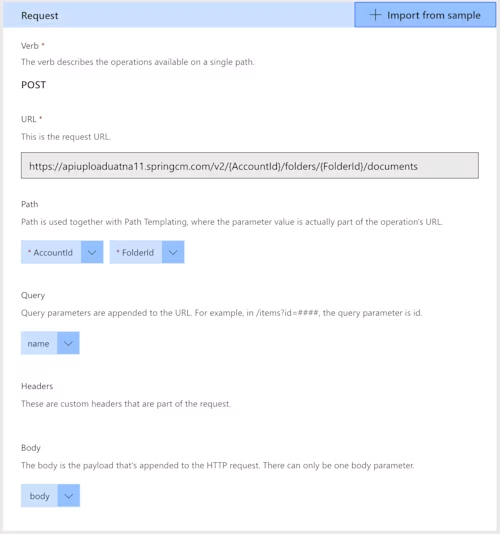
                    The finished request, all parameters added

                    Select Create connector. Under the Test tab, select + Create new connection to authenticate with Docusign. If you want this connection to persist, create a Heartbeat flow that uses the connection regularly, as described in my previous post.

                    Now you have the connector configured to upload into CLM. The next step is to create a Power Automate flow to archive documents to CLM.

                    Flow that watches for new SharePoint file then uploads into CLM

                    Create a new flow with three steps: a trigger and two action steps. The trigger is the Sharepoint trigger When a file is created (properties only). Populate your SharePoint site address, the library (which should be Documents), and the folder to watch. The first action step is a SharePoint Get File Contents step. For the Identifier, use dynamic content of Identifier. The second action step is the ContentUpload action you made above. Populate your Account ID and the Folder ID from CLM where the content will be placed in CLM. You can obtain the Folder ID by starting to share the folder as shown below.
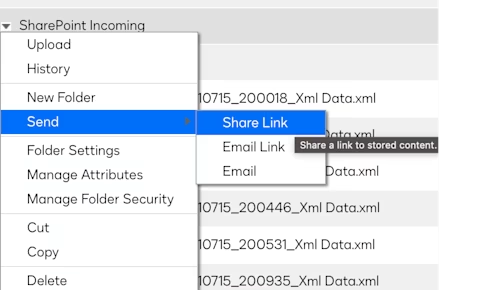
                    Getting the folder ID for your workflow by sharing it in SharePoint

                    The Share Link window will show an URL. The final component of that URL is the GUID of the Folder ID. Copy that GUID and place it into the FolderID field. Populate the name field with dynamic content of File name with extension. Populate the body field with dynamic content of Body. The flow should look like the image below.
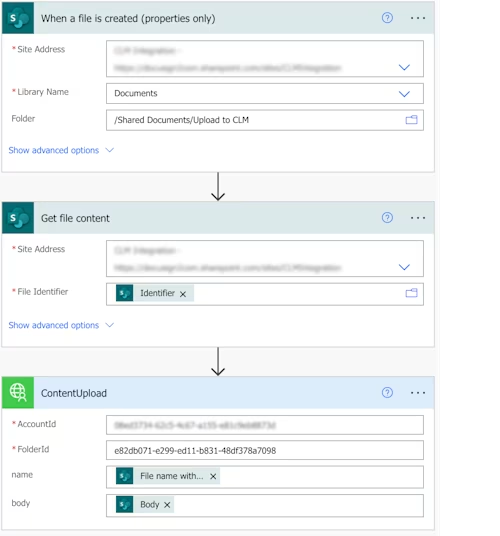
                    Completed flow for uploading SharePoint doc to CLM

                    Select Save to save the changes. Place a file in the designated SharePoint folder. Within a few seconds, your flow will run and place the document into the CLM folder that corresponds to the Folder ID.

                    Caveats

                    Keep in mind the following with regard to this integration.

                    • The Account ID is hardcoded but ideally should be passed into the flow.

                    • The Folder ID is hardcoded but ideally should be passed into the flow.

                    Conclusion

                    You now have automated integrations that will signal a CLM workflow and move documents back and forth between CLM and SharePoint. The next post will show you how to:

                    • Start a Doc Gen form, possibly with prefilled values

                    • Start a workflow, with or without data in Params

                    • Query CLM directly from a chatbot

                    Additional resources

                    Author Marty Scholes
                    Marty ScholesManager, ISV Partner Solution Architects

                    Marty Scholes has over 20 years of broad experience in the development and administration of database, storage, network systems, applications, and service management. He leads a team of Docusign Partner Success Architects who assist Docusign partners to design and deliver solutions that delight clients. Marty helps people master deep technical concepts so that they can make the most of technology.

                    More posts from this author

                    Related posts

                    • Docusign 2024 Release 3: Capture the Critical Business Value Hidden in Your Agreements
                      Intelligent Agreement Management

                      Docusign 2024 Release 3: Capture the Critical Business Value Hidden in Your Agreements

                    • How to improve your app’s UX while users wait for API calls to complete

                      How to improve your app’s UX while users wait for API calls to complete

                      Author Larry Kluger
                      Larry Kluger
                    • Trending Topics: Latest from our forums (November 2024)
                      Author Paige Rossi
                      Paige Rossi
                    How to improve your app’s UX while users wait for API calls to complete

                    How to improve your app’s UX while users wait for API calls to complete

                    Author Larry Kluger
                    Larry Kluger
                    Trending Topics: Latest from our forums (November 2024)
                    Author Paige Rossi
                    Paige Rossi

                    Discover what's new with Docusign IAM or start with eSignature for free

                    Explore Docusign IAMTry eSignature for Free
                    Person smiling while presenting