Blog series: Building a CLM–Power Automate custom connector: Even more examples
Partner Solutions Architect Marty Scholes completes his blog series on CLM-Power Automate connectors with three more advanced use cases.

In my first post of this series, I promised you would build example solutions, usable in real-world situations. The previous post showed how to signal a CLM workflow, archive a CLM document and attributes to SharePoint, and copy a SharePoint document into CLM. I saved the best for last. This final post will show how to build integrations that you might not have considered possible. By the end of this post, you will create solutions that:
Start a Doc Gen session at the intake form, complete with prefilled values for the form
Start a CLM workflow with a Params variable
Deploy a Teams chatbot that searches for documents containing a text string
The following sections describe how to do each of the above. Let’s start by initiating a Doc Gen session with a prefilled form.
Start Doc Gen
This example demonstrates starting a CLM Doc Gen session from a single URL with initial values for the intake form. You are going to build two components.
A new action for the custom connector
A flow that listens for a request, returning a JavaScript redirect
New action for custom connector
First, add a new action to your custom connector. Complete the General card as shown below.
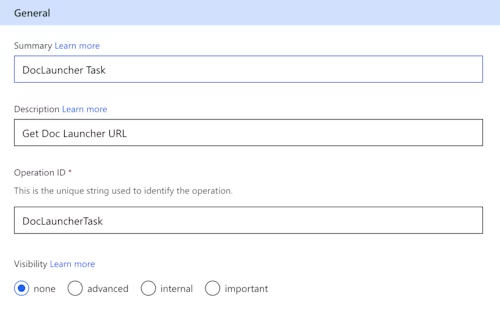
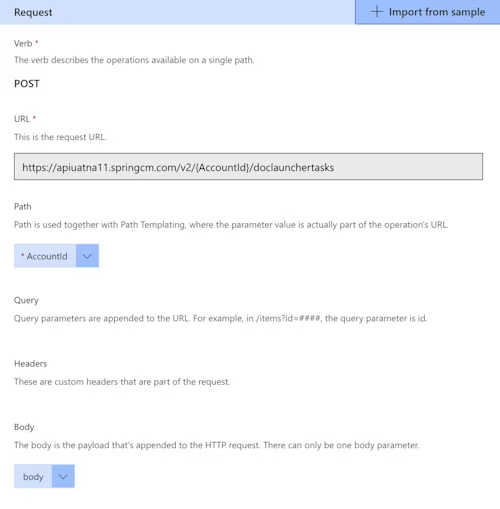
As before, select + Import from sample to create a request. Enter the values as shown below and then select Continue.
Take note of the following values:
Verb: POST
URL: https://apiuatna11.springcm.com/v2/{AccountId}/doclaunchertasks
Body: Any valid request body for this API call will suffice. An example is listed below.
{
    "Data": "<params></params>",
    "DataType": "XML",
    "DocLauncherConfiguration": {
        "Href": "https://apiuatna11.springcm.com"
    }
}
The resulting request should look like this:
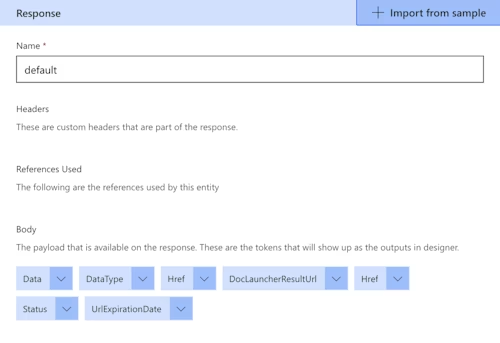
To define a default result, select + Import from sample, pasting in a JSON response from this API call. An example response is below.
{
   "Data": "<params></params>",
   "DataType": "XML",
   "DocLauncherConfiguration": {
       "Href": "https://apiuatna11.springcm.com"
   },
   "UrlExpirationDate": "2023-01-25T07:43:10.6467601Z",
   "DocLauncherResultUrl": "https://uatna11.springcm.com",
   "Status": "Success",
   "Href": ""
}
The resulting Response should look like this.
Select Update Connector to persist the changes. The next step is to build a flow.
Flow that listens for a request, returning a JavaScript redirect
Next, create a flow that listens for a request and then returns the Doc Gen URL via redirect. Create five steps:
HTTP request trigger step
Initialize AccountId variable
Initialize DocLauncherConfig variable
Call DocLauncher Task endpoint
Return response
Create a new flow that is triggered by the When a HTTP request is received step. Leave the method as GET.
Create an Initialize Variable step to initialize AccountId with your Account ID. Create a second Initialize Variable step to initialize DocLauncherConfig with any Doc Launcher Config URL retrieved from running the Get Doclauncher Configs API call via GET at the following endpoint. Note that the hostname could vary for your installation. Use Postman to query this endpoint.
https://apiuatna11.springcm.com/v2/{AccountId}/doclauncherconfigurations
Note that all of your Doc Launcher configurations will be returned. Locate the URL that is associated with the Doc Launcher you want this flow to start. Use this value to populate the DocLauncherConfig variable.
Call the DocLauncher Task step from your custom connector. Populate AccountId with the AccountId variable you initialized above. Set Data to the expression: triggerOutputs()['queries']['Data']
Set DataType to XML. Finally, set Href to the DocLauncherConfig variable you initialized above. When complete, the step should look like this.
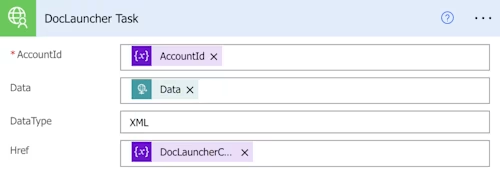
Finally, return a redirect to the browser calling this endpoint. Create a response step. Set the Status Code to 200. Set the Header Content-Type to text/html. Create the body to return a JavaScript redirect with the dynamic content of DocLauncherResultUrl as returned by the DocLauncher Task step defined above.
When complete, the step should look like this.
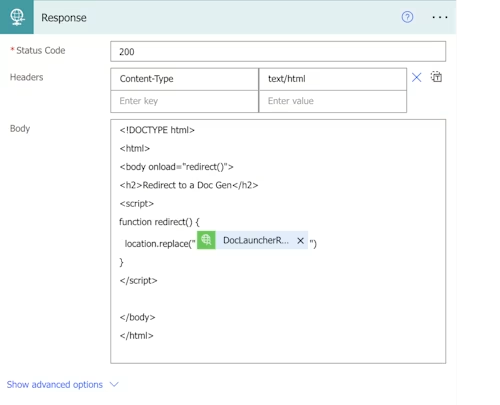
The response deserves some explanation. The intent is to have a browser invoke this flow with some prefilled form information. This flow will obtain a valid Doc Gen URL from Docusign CLM and then redirect the browser back to that URL, starting a Doc Gen session. The obvious way to do that is to have Power Automate return a 302 status code, which is the standard way to handle browser redirects. Unfortunately, Power Automate will not allow a 302 status code. Instead, this approach will return JavaScript that causes the browser to redirect to the new URL.
Copy the URL from the When a HTTP request is received step. You will add the Doc Gen prefill data to the end of the URL. When the browser calls this appended URL, the flow will trigger, obtaining a Doc Gen URL, returning the JavaScript to the browser, causing the browser to redirect to the Doc Gen URL.
Let’s discuss the prefill data. The content must be a single line of XML containing the Params value and is URL-encoded using libraries in your preferred programming language or online tools such as https://www.urlencoder.org. By way of example, the prefill data I am testing is:
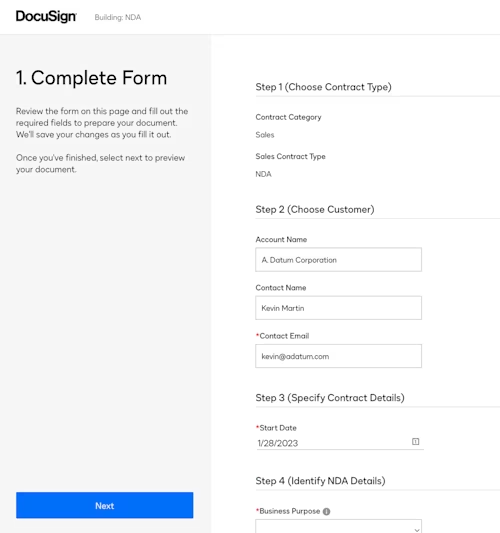
<params><contact_name>Kevin Martin</contact_name><contact_email>kevin@adatum.com</contact_email><account_name>A. Datum Corporation</account_name></params>
The XML above is formatted as multiple lines, but it must be passed as a single line of text. The URL-encoded version of the XML is:
%3CParams%3E%3CContact_Name%3EKevin%20Martin%3C%2FContact_Name%3E%3C Contact_Email%3Ekevin%40adatum.com%3C%2FContact_Email%3E%3CAccount_Name%3EA.%20Datum%20Corporation%3C%2FAccount_Name%3E%3C%2FParams%3E
Again, the above is passed as a single line. To append this data to the URL from the When a HTTP request is received step, append “&Data=” and then the URL-encoded XML. For example, suppose my When a HTTP request is received step has the URL:
https://somehost.com?var1=something&another=somethingelse
The appended URL would look like this:
https://somehost.com?var1=something&another=somethingelse& Data=%3CParams%3E%3CContact_Name%3EKevin%20Martin%3C%2FContact_Name%3E%3C Contact_Email%3Ekevin%40adatum.com%3C%2FContact_Email%3E%3CAccount_Name%3EA. %20Datum%20Corporation%3C%2FAccount_Name%3E%3C%2FParams%3E
Also note Doc Gen forms must be modified in order to accept prefilled values. If you do not know how to modify the Doc Gen forms, contact Docusign Support and request instructions on how to allow a form to accept prefill information.
Finally, pass the appended URL to a browser and watch for the prefilled Doc Gen form. In my case, calling the flow with the above XML produces the prefilled Doc Gen form below.
Caveats
Keep in mind the following with regard to this integration:
Both the Account ID and the Doc Launcher Config URL are hardcoded
The Doc Gen form must be modified to accept prefilled values
Prefilled data must be an URL-encoded single line of XML Params variable
If passing no data, provide an empty XML of
You have created a flow that allows for launching a prefilled Doc Gen form from a web browser. Next, launch a CLM workflow.
Start workflow
The next example demonstrates starting any CLM workflow and passing in the Params XML variable. You are going to build four items.
A new action for the custom connector
A flow that listens for a request, then starts a CLM workflow
A CLM workflow that will be started
A Postman request to call the Power Automate flow
New action for custom connector
First, add a new action to your custom connector. Complete the General card as shown below.
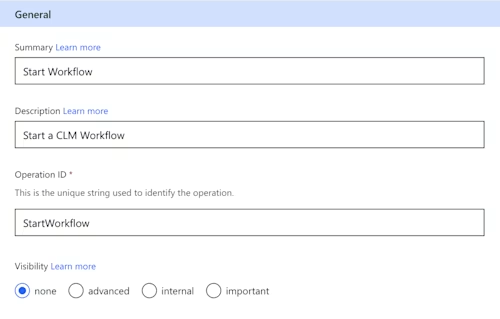
As before, select + Import from sample to create a request. Enter the values as shown below and then select Continue.
Take note of the following values:
Verb: POST
URL: https://apiuatna11.springcm.com/v2/{AccountId}/workflows
Body: Any valid request body for this API call will suffice. An example is listed below.
{
    "Name": "Show XML",
    "Params": "<desc>From Postman, through Power Automate</desc>"
}
The resulting request should look like this:
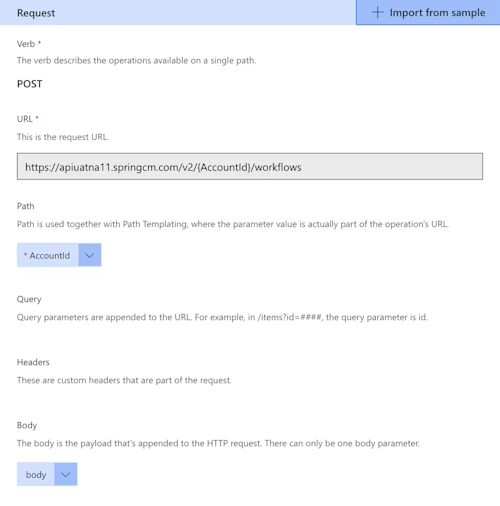
Define a default result, select + Import from sample, pasting in a JSON response from this API call. An example response is below.
{
    "Name": "Show XML",
    "StartDate": "2023-01-30T19:50:47.65Z",
    "EndDate": "2023-01-30T19:50:47.897Z",
    "Status": "Completed",
    "Info": "",
    "Href": "https://apiuatna11.springcm.com"
}
The resulting Response should look like this.
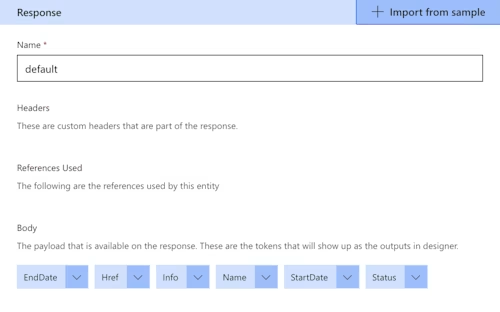
Select Update Connector to persist changes. With the new action defined, now create a flow to use it.
Flow to start a CLM workflow
The flow contains only a trigger step and two action steps. Start the flow with the trigger step When a HTTP request is received. Set the method to POST and use the JSON request body schema below.
{
    "type": "object",
    "properties": {
        "Name": {
            "type": "string"
        },
        "Params": {
            "type": "string"
        }
    }
 }
The next step is to initialize the AccountId variable to your Account ID. The final step calls the action you defined above. Populate the three fields with dynamic content as shown below.

Save the flow and then make a copy of the HTTP POST URL in the trigger step.
CLM workflow
Create the CLM workflow that will be started by the above flow. Put only a single Start and Finish step in the workflow and name the workflow Show XML.
Postman request
Create a Postman request to trigger the Power Automate flow, which in turn will start the CLM workflow. The request will call the HTTP POST URL you copied above using the POST method and with the below body text.
{
   "Name": "Show XML",
   "Params": "<desc>From Postman, through Power Automate</desc>"
}
Run the Postman request, which will call the Power Automate flow, which will then start your CLM workflow. Open CLM to see that the Params XML variable has been passed into the Show XML workflow, as shown below.

You can use this same approach to call any CLM workflow, passing in the Params variable for the workflow.
Caveats
Keep in mind the following with regard to this integration:
Since there are no restrictions on starting this flow, any malicious process could start any CLM workflow with any data payload.
In a real deployment, ensure that you restrict what processes are allowed to invoke this Power Automate flow.
The Account ID is hardcoded into the flow but should ideally be passed into the flow.
Query with Chatbot
This example demonstrates querying CLM via a Teams chatbot. This chatbot will perform a text search of CLM documents, returning a hyperlinked list of documents. Selecting a document from the list will open a web page to preview the document in CLM. You are going to build three components.
A new action for the custom connector to search CLM documents
A Power Virtual Agent (i.e. chatbot) that will call a flow
While building the Power Virtual Agent, you will build a flow that queries CLM and then returns a list of documents that contain the search text.
New action for the custom connector to search CLM documents
First, add a new action to your custom connector. Complete the General card as shown below.
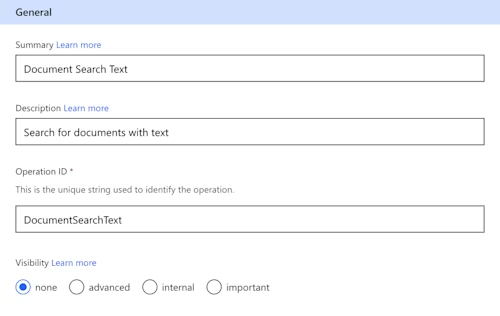
As before, select + Import from sample to create a request. Enter the values as shown below and then select Continue.
Take note of the following values:
Verb: POST
URL: https://apiuatna11.springcm.com/v2/{AccountId}/documentsearchtasks
Body: Use the below body.
{
   "content": "Search Text"
}
The resulting request should look like this:
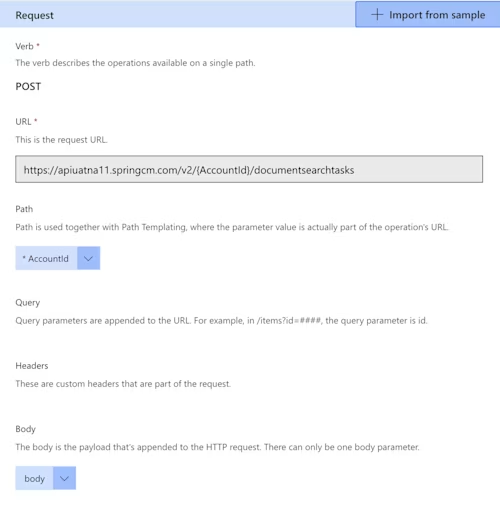
Define a default result, select + Import from sample, pasting in a JSON response from this API call. Using Postman, call the documentsearchtasks endpoint to obtain the response to paste here.
The resulting Response should look like this.
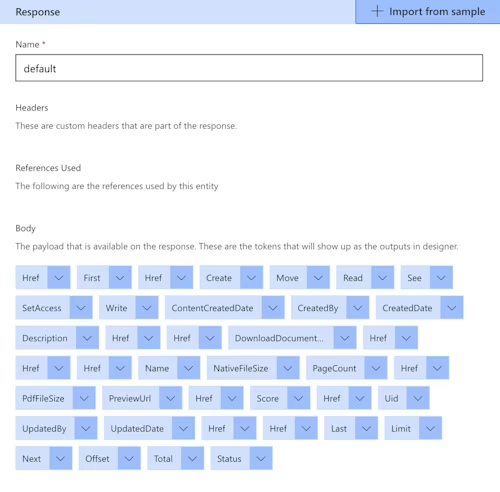
Select Update Connector to persist changes. With the new action defined, now create a chatbot and flow to use it.
Power Virtual Agent
In this section you are going to create a chatbot, which Microsoft calls a Power Virtual Agent. This is a longer section than normal because the associated Power Automate flow can only be defined as part of the Power Virtual Agent definition, so you will be defining both here: Power Virtual Agent and Power Automate flow. To start, log in to the main Power Virtual Agent portal at https://powervirtualagents.microsoft.com. You may need to begin or extend a trial.
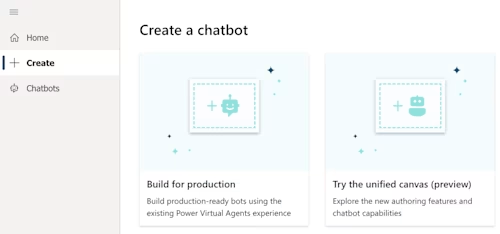
Incredibly powerful and extensible, Power Virtual Agents can deliver many capabilities. For the purposes of this post, you are going to create CLM text search capability. First, select the + Create item on the left menu and choose the unified canvas option on the right as shown below.
Give your bot a name, choose your preferred language, then select Create to build the bot. It will take a few moments for the build to complete. When the bot is finished initializing, the screen will show a menu bar on the left, a test pane, and an overview pane. For testing, you will interact with your bot in the test pane. Select Topics in the left menu to build the bot.
In Power Virtual Agents, each bot is subdivided into different topics, such as a greeting and ending the chat. Each bot starts with seven initial topics. Feel free to leave those in place and active. You will need to create a new topic. Select + New Topic at the top of the window. An untitled topic card will appear with a prompt to add trigger phrases, similar to the image below.
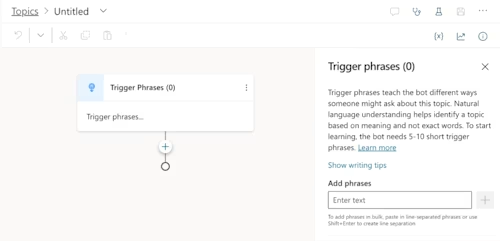
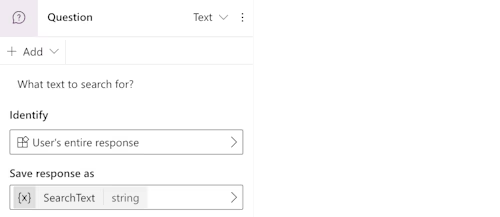
Change the topic title to CLM Text Search and then add a trigger phrase of Search. Select the + symbol to add a Question node, where the bot will ask for a text search term. Choose User’s entire response and save the response in the string SearchText, as shown below.
Since the API call can take a few seconds, send a message to notify the user that the search is progressing. Select the + symbol to choose Send a message stating that the chatbot is searching.

The next step is to create an action step that will call a flow you are about to define. It is unclear why the flow must be defined as part of the chatbot definition. Select the + symbol to choose Call an action and then Create a flow as shown below.
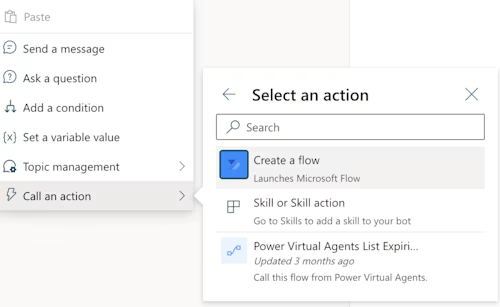
The browser will open a Power Automate flow editor window with the first and final steps already created, as shown below.
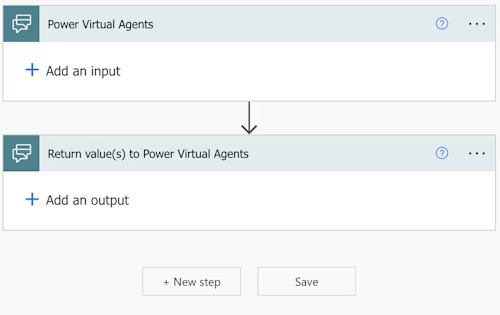
First, change the default name in the upper left corner to something useful, such as CLM Text Search. The default name can cause confusion with multiple chatbot flows.
For the trigger step, you will need to add the text input named Search Text. The step should look like this.

Select + New step to add a step to call the new Document Search Text action you created above with your custom connector. Populate your Account ID. For the content, insert the dynamic content of the Search Text input from the trigger step.
Select + New step to add Initialize variable step as shown below. Name the variable BotResponse, type String, with a value as shown below.

Note: be sure to include a carriage return at the end of the string, causing the Value field to appear to be two lines of text. This step will declare and initialize the response returned to the chatbot.
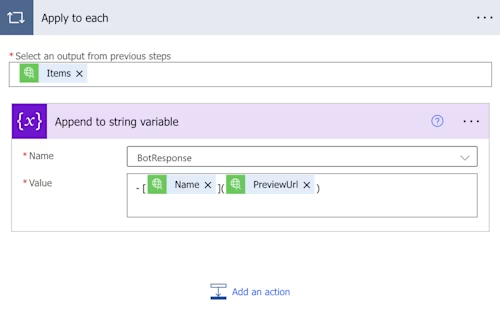
Select + New step to add Apply to each step as shown below. Place the Items dynamic content into the field. Within this step, select Add an action to add the Append to string variable action. This step will iterate the documents returned by CLM to format a response. Select the BotResponse variable for the Name. Populate the Value as shown below. The value is a little tricky as it contains Markdown to format the response, requiring specific syntax, along with embedded dynamic content. The actual text consists of the following and will look like the image below.
Hyphen
Space
Open bracket
Dynamic content of Name
Close bracket
Open parenthesis
Dynamic content of PreviewUrl
Close parenthesis
Carriage return
Populate the Return value(s) to Power Virtual Agents step as shown below.

When done, your flow should look like this.
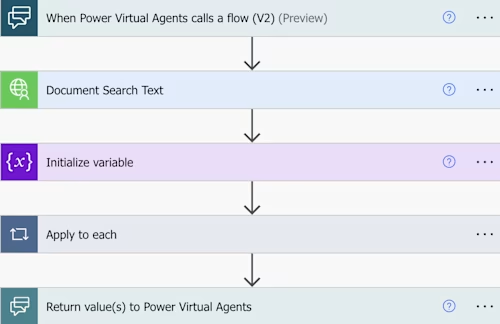
Select Save to save the flow. Confirm that the flow was properly renamed from the default name. If not, rename the flow and then select Save. Next, return to the chatbot window that defined the flow. Select Done on the chatbot confirmation.

The flow name should now be visible in the Call an action list as shown below.
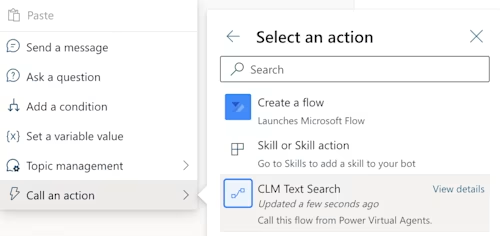
Select the flow that you created. Populate the Input field with the SearchText string as shown below.
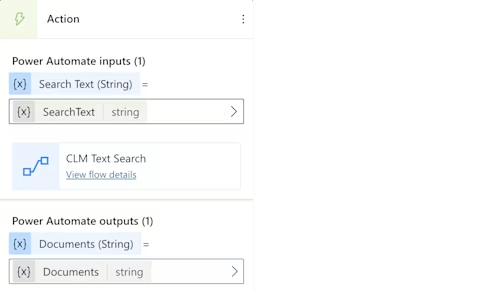
Select the + symbol to choose Send a message. Select the {x} menu item to insert a variable as shown below.

Select the Documents variable. This step will display the variable containing the document list within the chat session. When complete, the Message action will look like this.

Select the diskette icon in the upper right to save the topic. Your chatbot is complete but not yet promoted to Teams. Test it by typing in a search term into the test pane. First type Search and then type your search term, such as Breach. After a few seconds, you will see a list of documents as HTML links that lead to CLM Document Preview.
The final step is to publish the chatbot for use in Teams, a demo website, or other location. Follow the Microsoft instructions for publishing to Teams on the Publish your bot page. You may need to download the chatbot as a Teams app and then upload the app to Teams. This is what my chatbot looks like in Teams.
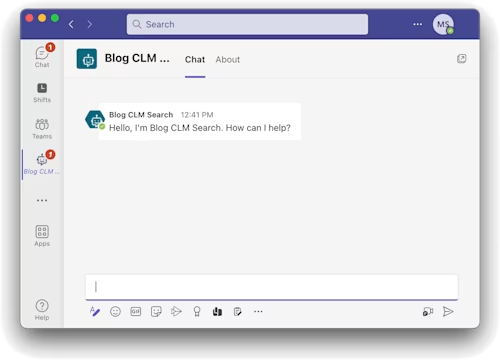
Note that this search can be extended to handle more complex searches, such as searching for documents with specific attributes. Beyond searching for documents, this approach could be used to query and manipulate anything within CLM that is available via the API.
Caveats
Keep in mind the following with regard to this integration:
The CLM Account ID is hardcoded.
Anyone who can access the chatbot can access the document lists, but the user must be defined in CLM in order to see the preview.
CLM pages the search list in pages of 100 entries at a time. A complete solution would need to retrieve all of the pages in the list. This example retrieves only the first 100 documents in the list.
Conclusion
You covered a lot of ground in this blog series. Consider what you have learned:
which integration type is appropriate for each circumstance
the two primary Docusign authentication methods
how to build Power Automate custom connectors for CLM
how to create a persistent connection to Docusign with Power Automate and then leverage it for multiple flows
how to signal a CLM workflow
how to archive a CLM document and attributes to SharePoint
how to copy a SharePoint document into CLM
how to start a Doc Gen session at the intake form, complete with prefilled values for the form
how to start a CLM workflow with a Params variable
how to deploy a Teams chatbot that searches for documents containing a text string
I suspect that for you, this is just the beginning. The purpose of this blog series is to give you the theoretical background, knowledge of the pitfalls and best practices, practical experience, and examples of how to build safe, efficient, reliable, versatile, and easy-to-deploy Power Automate custom connectors for CLM. You now have everything you need to build production-class integrations to CLM using Power Automate.
My challenge to you: take what you have learned from this series to build amazing solutions.
Additional resources

Marty Scholes has over 20 years of broad experience in the development and administration of database, storage, network systems, applications, and service management. He leads a team of Docusign Partner Success Architects who assist Docusign partners to design and deliver solutions that delight clients. Marty helps people master deep technical concepts so that they can make the most of technology.
Related posts
Docusign IAM is the agreement platform your business needs


