Create a Template for Commonly Used E-Signature Forms
Using templates in Docusign eSignature is an excellent way to save time when sending the same document regularly to different recipients.
Table of contents

Electronic signature gives you the ability to complete contracts, consents, and other agreements in minutes rather than days. But what if you are sending the same contract or form, such as common HR forms on a regular basis to employees? Using templates in Docusign eSignature is an excellent way to streamline business processes and save even more time. Once a tagging template is created, it will automatically populate a document with the same tags in the same locations. This is particularly useful when sending the same heavily tagged documents to many different recipients.
How to create a template in eSignature
This procedure outlines how to create a template in Docusign, and addresses all the things you can add or set for your template, but all steps are optional and you can choose exactly how you want to set up your template. You can save a template at any level of completeness.
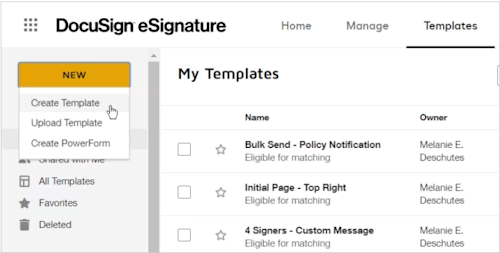
From the Templates page, click NEW and select Create Template.

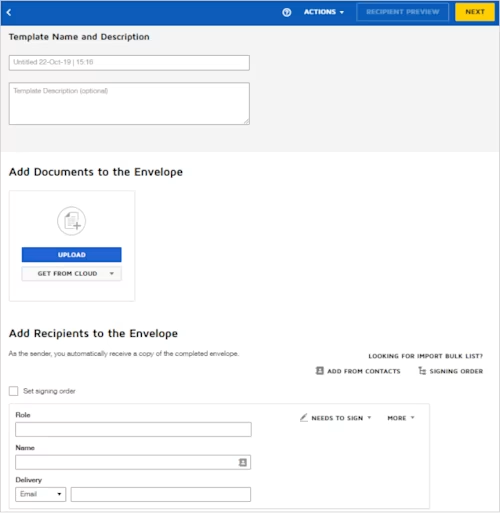
The prepare view appears where you can add files, recipient roles, and messaging.

Enter a name and description for your template. These entries are visible only on the template itself and are not seen by signers of any envelopes generated from the template.
To upload one or more files to the template from your local machine or from one of your authorized cloud storage providers, follow the regular procedure described in Add Files.
To add recipient roles, do the following.
Define the role for the recipient in the Role field.
The role helps template users understand whom to enter as the recipient when they use the template to send a document. Example: Applicant, Client, Sales Rep
Enter a unique role to represent each individual who must sign your document. Example: Applicant 1; Applicant 2. You can use the signing order option if you need to route the envelope to the same role more than once.
Note that while roles are not required, in order to set up fields on your document, you must enter a recipient role for each individual who will act on your document.
Select the signing action for the recipient role. Example: Needs to Sign
To add additional recipient roles, click ADD RECIPIENT and repeat steps a-b.
To add named recipients, do the following:
Enter the person's email address and name.
Select the signing action for the recipient.
(Optional) Enter a role for the recipient. The role entry is optional and is useful to define why the person is signing the document. Example: Sales Approval
To add additional named recipients, click ADD RECIPIENT and repeat steps a-c.
To set a routing order for your document or add an authentication method, follow the regular procedure described in Add Recipients.
To define a standard message for your template, or to add private messages for individual recipients, follow the regular procedure described in Add Messages.
To set advanced options, such as reminder and expiration schedules, or to add a password to protect your template from being modified, click the Edit link next to the Advanced Options details.
To save your template without adding fields, click ACTIONS and select SAVE AND CLOSE.
To set the signing fields for your document, click NEXT.
To add signing fields for each of your template recipients, follow the regular procedure described in Add Fields to Documents.
To finish your template, click SAVE AND CLOSE.
Your template is saved and ready to use.

Yasamin Yousefi is a director of product marketing for Sign products at Docusign.
Related posts
Docusign IAM is the agreement platform your business needs


