
DocusignとMicrosoft Power Automateによる連携(2)実際の使用例
今回のブログ記事では、DocusignとSharePoint連携をMicrosoft Power Automate(旧Microsoft Flow)で自動化し、SharePoint上で契約内容の全文検索だけでなく、契約書の日付や金額による範囲指定検索を可能にする方法をステップバイステップで解説します。

前回のブログ記事では、DocusignとMicrosoft Power Automateの連携に関する概要とトリガーについて解説しましたが、今回はDocusignとSharePoint連携でMicrosoft Power Automate(旧Microsoft Flow)を使い、契約書の契約日と終了日、契約金額をSharePointの検索プロパティとして Docusign上で入力されたフィールド項目から自動で設定する方法について解説します。(以下DocusignのDemoコネクタを使用しています。)
準備設定
まず、Docusign上でテンプレートを作成します。この時に配置するフィールドの名前をデータフィールドで設定します。ここでは金額、契約日、契約終了日を設定しています。
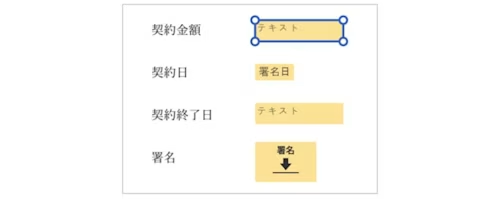

SharePoint上のドキュメントの列の追加で、上記のDocusignフィールドにマッチするように**契約日(日付)、契約終了日(日付)、金額(数値)**を設定します。

Microsoft Power Automateで処理ロジックを記述します。大まかには、エンベロープステータス変更時にエンベロープドキュメントを取得してSharePointにそのファイルを書き戻すとともに、検索プロパティをドキュメントフィールドから取得して設定します。

トリガーイベントでDocusignのAccountを選択し、Connect nameを設定(任意)、Envelope eventを [Completed] にします。

Get envelope documentsでは、Docusign Accountを選択し、Envelopeは動的コンテンツであるEnvelope IDを選択します。ここではCertificate of completionを [いいえ] にしています。

Apply to eachで動的コンテンツであるRecipientStatusを選択し、条件はRouting Orderがstring(1)に等しい場合を設定しています。

条件が [はい] の場合、SharePointでファイルの作成とファイルプロパティの更新を設定します。
ファイルの作成では書き込み先のサイトのアドレスとフォルダーパスを設定します。ファイル名はDocusignの動的コンテンツから生成し、ファイルコンテンツはDocusignの動的コンテンツのFile Contentを指定します。
ファイルプロパティでは、サイトのアドレスとライブラリ名、SharePointのItemIDを指定し、Docusignの動的コンテンツからタイトル=Subject、契約終了日、金額、契約日を各フィールドから @item()?['tabs']['金額']のように入力します。(最終的な表示はtabs.金額のようになります。)
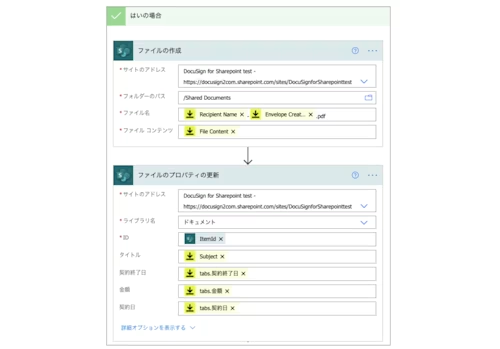
その後、保存します。

動作
SharePointのドキュメントにアップロードした契約書から、[Docusignを使用して署名を取得] を選択します。Docusignにログインしていなければログイン、複数アカウントがある場合は該当アカウントを選択します。
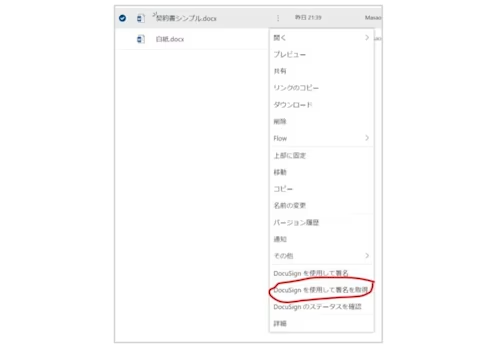
Docusign側でテンプレートを設定しておけば、一致するテンプレートを指定できます。

送信された契約書に契約金額と契約終了日を入力し、署名して完了します。
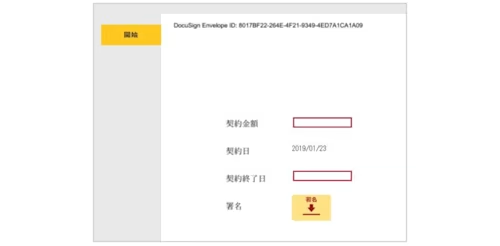
契約日、契約終了日、金額の項目に、署名者がDocusignで入力した情報が反映されていることを確認します。SharePoint上の契約書の検索プロパティにより、日付や金額による範囲指定検索が可能になります。

今回ご覧いただきましたように、DocusignとSharePointの連携をMicrosoft Power Automateで自動化することで、SharePoint上の契約書に検索プロパティが自動で設定されます。これにより、SharePoint上で契約内容の全文検索だけでなく、契約書の日付や金額による範囲指定検索も可能になります。
参照:https://docs.microsoft.com/ja-jp/connectors/docusign/
DocusignとMicrosoft Power Automateによる連携について

eSignatureから使い始めるか、営業チームに最適なプランの作成を依頼


