
Expanding Power Automate Series: Common post-signing tasks
Docusign for Power Automate not only lets you automate electronic signatures. but also follow up with essentials after signatures are complete. See how to use Power Automate to trigger post-signing workflows, get doucument field data, and get envelope attachments.

In this blog post, I’m going to explore six common Power Automate tasks performed after an envelope has been completed. This includes standard and advanced options for triggering a flow, getting document field data, and getting attachments.
Six common tasks
Standard | Advanced | |
|---|---|---|
Trigger Flow | ||
Get Field Data | ||
Get Document |
The common tasks in this article can be easily used to meet your specific business needs; for example:
In procurement, collect the relevant contract data and attachments, and update a SharePoint Document library.
In HR onboarding, when a new employee completes and signs an onboarding pack, a trigger could collect the personal details, create an employee profile and notify payroll.
In sales, once a contract is signed a new license could be provisioned and key data written back to Microsoft Dynamics.
Let’s take a look at how it works.
Create a trigger
Standard: Add trigger step
Create a new Automated Flow. Select New Flow > Automated cloud flow.
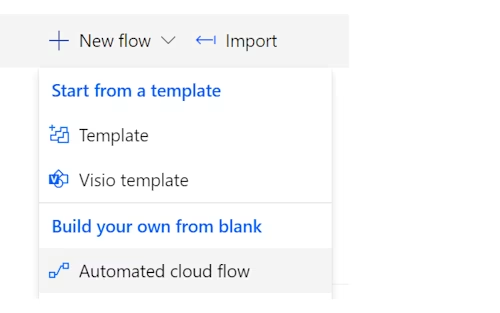
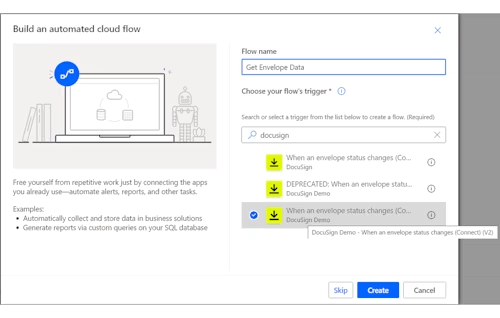
Add Trigger. Name your flow, select When an envelope status changes (Connect) (V2) (or the latest version), and then click Create.
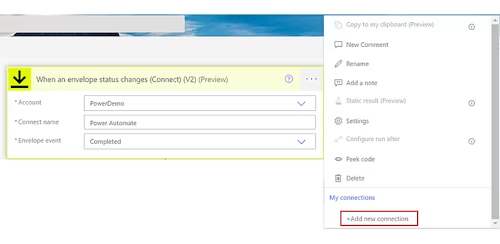
Set up Trigger: Authenticate with Docusign by clicking the three dots, then +Add new connection.
Select the Account, provide a descriptive Connect name, and select “Completed” for the Envelope event (since we’re waiting for the envelope to be completed to trigger this flow).
Advanced: Set up trigger conditions
The standard trigger you just set up will be called whenever any envelope reaches a completed status. You may want to add an additional filter, so only specific envelopes that meet your criteria are triggered. The example below will only trigger for a specific HR onboarding process envelope (that is completed).
Add Trigger. Complete Standard: Add Trigger Step above.
Go to Settings: Right-click the When an envelope status changes (Connect) step, and select Settings.

Add Trigger Condition. Under Trigger Conditions, click +Add.

This is where you can add the filter. Typically, the best filters will be based on the type of envelope that you are looking for, so adding an Envelope Custom Field as metadata when sending the envelope is how you’ll be able to easily find it here. Below is an example with the following input
Envelope Custom Field Label = “Process”
Envelope Custom Field Value = “HR Onboarding”
Trigger Condition:
@equals(triggerBody()?['data']?['envelopeSummary']?['customFields']?['Process'],'HR Onboarding')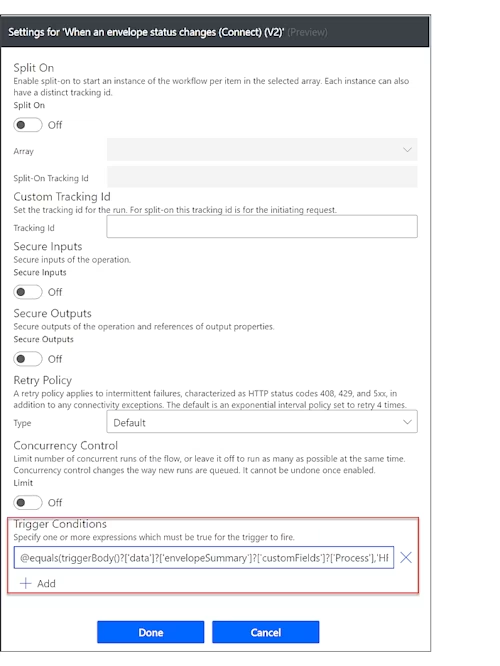
Check out the Power Automate Guide for more info on formatting options (for instance, you can also filter on document custom fields).
Get field data
Standard: Single recipient
This is the standard process when there is a single recipient in the envelope. When there are multiple recipients, you need to wrap each data output with a condition (see below).
Add Step: Compose. This is to output the “Mobile” field. Click Expression and type:
item()?['tabs']['Mobile']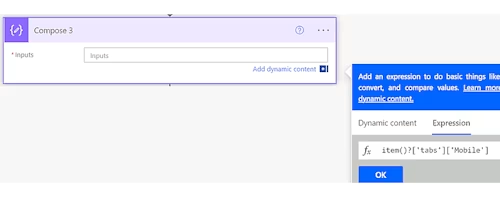
Note: This is to simply output the mobile value. You can add your own steps to insert it into your record of choice (such as a SharePoint list, Dynamics account record, or other location).
Advanced: Multiple recipients
Add Step: Condition. Let’s say you’re going to capture the data from a text field named “Mobile”. You need to check if that field exists first before you get it (otherwise you’ll get an error).
Left value: Tabs
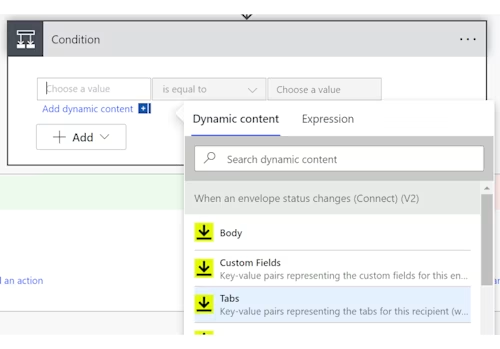
condition: contains
right value: Mobile
Note: Power Automate will automatically add this to an Apply Each loop. This just means it will loop through all tabs (fields) for each signer. This won’t affect the behavior, as you can control which fields to collect (based on the simple “if [field] exists” conditions applied).
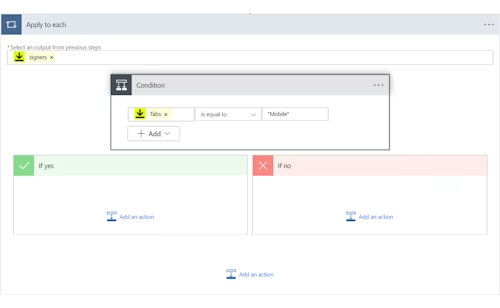
Add Step: Compose (under the “if yes” branch). This is to output the Mobile field. Click Expression and type:
item()?['tabs']['Mobile']Note: This is to simply output the mobile value. You can add your own steps to insert it into your record of choice (such as a SharePoint list, Dynamics account record, or other location).
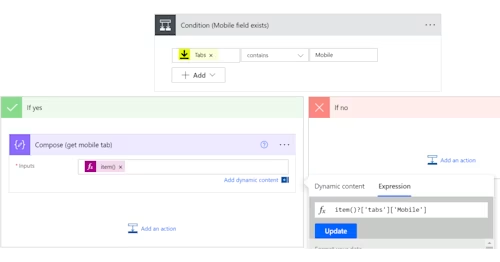
Save. Getting the data will now look like this:
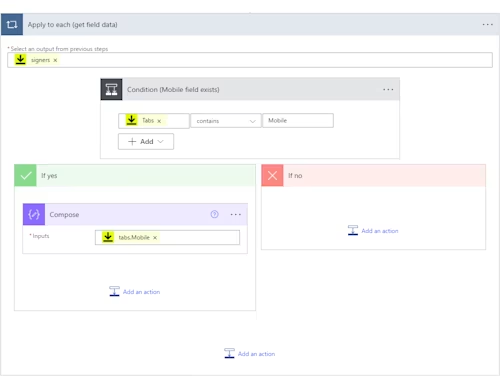
To get more data from tab data (eg. address, communication preferences, etc), simply repeat the steps above for each tab to add a condition and output the tab value.
Alternative option: If there are many tabs that belong to a single recipient, instead of adding a condition for every tab, you could add a single condition for the recipient instead (such as
RoutingOrder="1"for the first recipient) and then just output all the fields for that recipient within that single condition.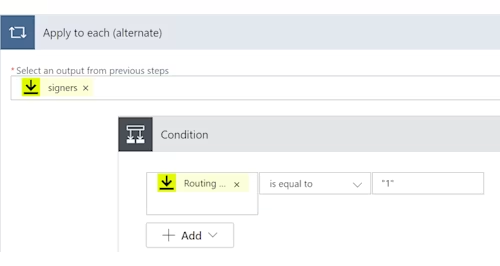
Get documents
This is where you can get the documents contained within an envelope. These include the signed and supplementary documents, the attachments and the certification of completion.
Standard: Get all envelope documents
This will extract all envelope documents together into a single PDF. This is perfect for archiving in SharePoint, adding onto a record within a SharePoint List or part of a custom MS Dynamics workflow.
Add Step: Get envelope documents. Select the Account, add the Envelope ID and Select whether or not you want to include the Certificate of Completion (audit trail).

Advanced: Get only the attachments
You may have specific use cases that require only the attachments be extracted separately to the remaining documents. For example, the evidence of employee certification is being collected for construction staff before they start a project on site, or the attached resume needs archiving for a recruitment scenario.
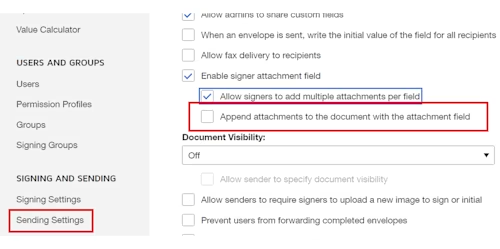
Log in to Docusign, go to Settings > Sending Settings, and ensure this option is unchecked: “Append attachments to the document with the attachment field”.
Create a custom connector. Follow “Step 1: Docusign Setup” and “Create a custom connector” steps in my earlier blog: Get into the flow...
Add Definition. When you reach “3. Definition” within the Custom Connector wizard, add these two operations:
Summary: List Documents
Verb:
GETURL:
https://demo.docusign.net/restapi/v2.1/accounts/{accountId}/envelopes/{envelopeId}/documentsHeaders:
Content-Type application/json
Summary: Get Document
Verb:
GETURL:
https://demo.docusign.net/restapi/v2.1/accounts/{accountId}/envelopes/{envelopeId}/documents/{documentId}Headers:
Content-Type application/json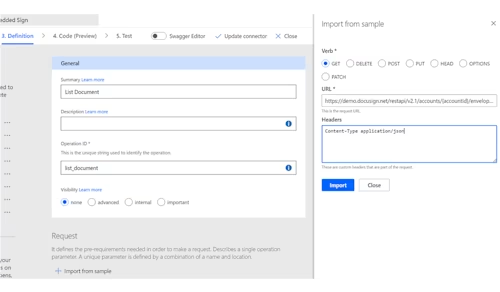
Add Step: List Document. Add the “Sender’s Account ID” and the “Envelope ID”

Add Step: Parse JSON.
Content: Body (from previous List Documents step)
Schema:
{ "type": "object", "properties": { "envelopeId": { "type": "string" }, "envelopeDocuments": { "type": "array", "items": { "type": "object", "properties": { "documentId": { "type": "string" }, "documentIdGuid": { "type": "string" }, "name": { "type": "string" }, "attachmentTabId": { "type": "string" } } } } } }Note: This is the current schema as of writing. This will work with most implementations, however if you encounter issues, you can keep this JSON Parse step blank, then run a test to trigger this flow. The output of the flow will contain the Sample code. You can import the same code and Power Automate will generate a schema for you, specific to your setup and the current REST API version.
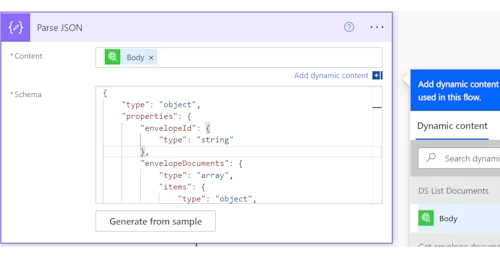
Add Step: Apply to each. Add “envelopeDocument” as the output:
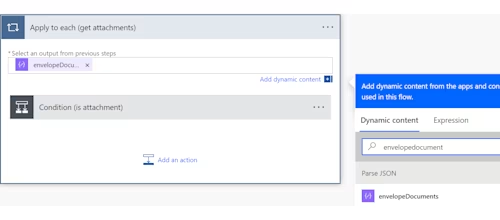
Add Step: Condition.
left: Current item
middle: contains
right: attachmentTabId
Add Step: Get Document. Under “If yes”, add the Sender’s Account ID, envelope ID, and document ID as values.
Add Step: Create file. Store each attachment file individually in a SharePoint folder. Select the Site Address, Folder Path, and use variables from the “Parse JSON” step to create a unique filename. The File Content is the “Body” from the previous “Get Document” step.
This example for getting attachments will also provide you a foundation to meet other specific needs, such as:
Recognise each attachment and upload into separate folders (if attachmentTabid = [guid] then…)
Get only the certificate of completion, or only the signed PDFs
Communication: For an embedded signing scenario you may want to send your own custom completion email (or MS Teams notification), instead of relying on the standard Docusign completion email process. This gives you the ability to extract the exact document you’d like to share with each recipient.
That’s all there is to it. Now give it a whirl!
Additional resources

Mo is a Principal Solution Architect with over 20 years of experience working with companies of all sizes, helping them realise their digital strategies. Mo is based on Australia, loves all things low-code, architecture, and is currently attempting to master the art of dad jokes.
Related posts
Docusign IAM is the agreement platform your business needs


