
A Guide to Your Docusign Free Trial
If you’re interested in using Docusign eSignature to streamline your agreement process, we offer a free 30-day trial you can try.
If you’re interested in using Docusign to streamline your agreement process, we offer a free 30-day trial you can try out before committing to a paid plan. You can use many of the top features from Docusign while deciding which Docusign plan is the right fit for your needs.
Additionally, we offer other free Docusign options. You’ll find additional free account options for those looking to primarily sign and store agreements to an account for developers looking to build integrations using our APIs.
Create your trial account
If you still need to create your free 30-day trial account, go to this sign-up page and input your email to get started. No credit card is required, so you won’t be charged once the 30-day trial period expires.
How to use the free Docusign Trial
In this guide, we’ll walk you through the basic setup and features of your free 30-day Docusign Trial, including how to quickly set up your profile, send out envelopes for signature, and confidently navigate your account to change settings and manage your envelopes.
Once you’ve logged into your free trial account, you’ll see a Get Started guide on the right side of the page. We highly recommend using this handy tool to get up and running with essential Docusign features.
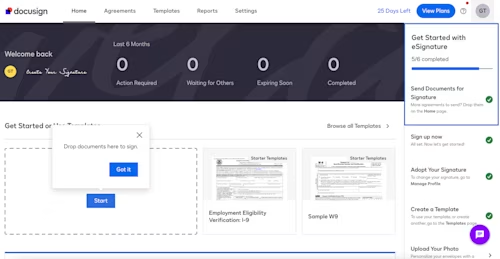
Click on Send Documents for Signature on the right-hand side to send an agreement for signature. A pop-up window will prompt you to drop documents into the box with a dashed border on the left-hand side of the page, which will get you started with sending documents. Note that you don’t have to use the Get Started guide in sequential order, so feel free to play around and set up each step as you need.
If you need more guidance setting up and using your Trial account, we’ll break down each of these important steps in the following post.
Customize your signature and profile information
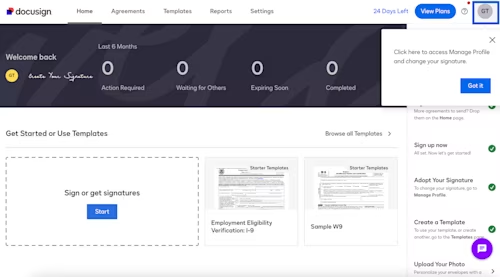
To customize the signature of your signed agreements, click on Adopt Your Signature in the Get Started Guide. You’re then prompted to click on your account profile icon in the upper-right corner before selecting Manage Profile.
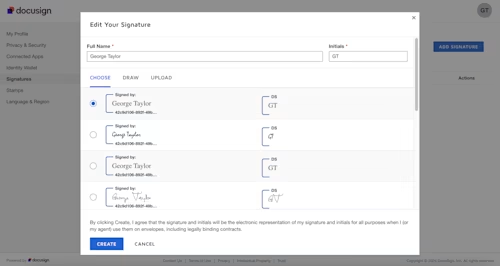
Now go to Signatures and select the Add Signature button to pull up your signature customization options. From here, you can edit your signature and initials and choose the style that best suits your preferences — simple text or elegant cursive signature. Select Create to use this as your signature on all your agreements.
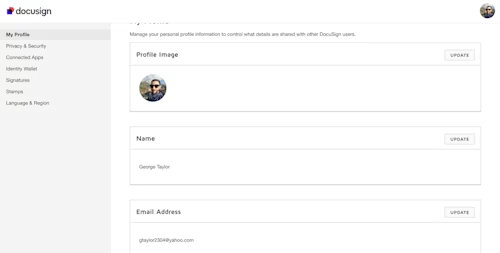
Next, you can customize your profile information in the same My Profile menu. From here, you can upload your profile image and then add your name, email address, and contact information. Because this menu is in a separate browser tab, make sure to navigate to your previous tab for your account home screen.
Send an envelope for signature
After setting up your signature, you’ll want to send out an envelope to external parties for their signature(s). For your reference, an envelope is a document container you send to a recipient for signature, and it can include one document or many documents.
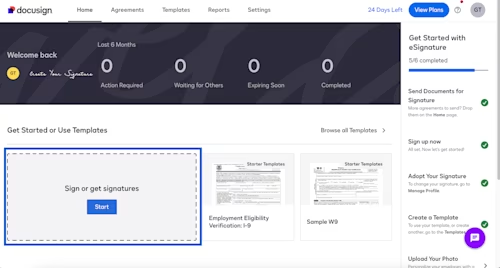
On the main page of your free Docusign Trial, you’ll see an area on the left-hand side (delineated in blue below) where you can drop documents to get started. You can also select the Start button. Either of these options will initiate sending an envelope out for signature.
For an in-depth understanding of this process, please consult our Support guide on How to Send an Envelope for additional guidance.
Our Support guide explains how to attach your intended document(s) to your envelope, add recipients, customize your message, and add fields to collect vital signer information.
Manage your envelopes
After you have sent an envelope for signature, you’ll want to manage your envelope and monitor its status by selecting Agreements at the top of your account’s navigation bar.
From here, you’ll see all your envelopes neatly organized into Inbox, Sent, Completed, and Action Required categories. Additionally, if you click on Show More, you’ll find additional agreement options, such as your Drafts, Deleted, Waiting for Others, Expiring Soon, Authentication Failed, and Bulk Send.
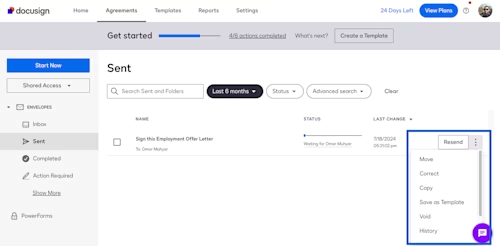
Notice the Employment Offer Letter is waiting on the envelope recipient in the example below, as the intended signer still needs to review and sign the agreement.
You can Resend the agreement, if necessary, by clicking the Resend button on the right side of the agreement status. Additionally, you can click on the three dots for additional options, from moving this agreement to saving it as a template for future use to viewing its history.
Use and create Templates to save time
Templates are the best way to streamline the sending process and send a standardized agreement to your signers for specific contractual and agreement purposes. Examples include statements of work (SOWs) to contractors, non-disclosure agreements (NDAs) for legal purposes, insurance claim forms, and any other standardized agreement you use regularly.
The best way to start the template process is by navigating to the Templates tab at the top of your account navigation menu.
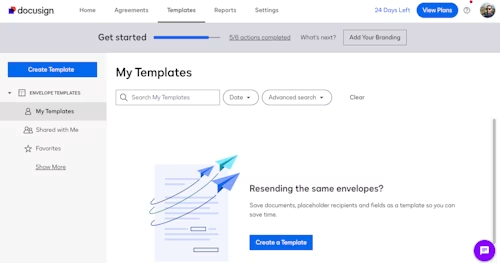
Once you’re in Templates, your trial account won’t have any templates saved. In this instance, you can click on Create a Template, which will allow you to upload a compatible template file and fill out all the details of your template. This process works with JSON and XML file types; you can even use a .zip file to upload multiple template files at once.
Please note there are multiple ways to create a template. You can use an envelope you’ve already sent as the starting point for one or decide to download a pre-built template from our extensive library.
Before downloading a template from our library, please watch this brief video for a step-by-step breakdown. Then, navigate to your Templates tab and upload the file to get started.
View your dashboard under the Reports tab
You can run specific reports related to account activity under the Reports tab at the top of your account navigation.
For this example, we run a Recipient Activity Report. This report is a great way to audit your envelope performance and completion rate, especially for accounts with larger transaction volumes.
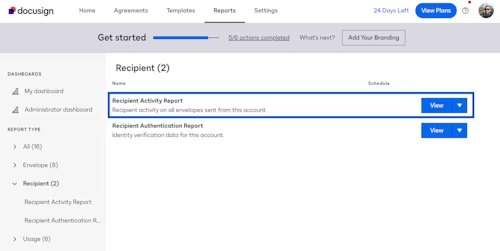
Once you click View, you’re directed to a page where you can specify your date range and envelope data type and use additional filters to fine-tune your report. Click on Run report, and you’ll get a detailed report of your envelope recipients, like the following example.
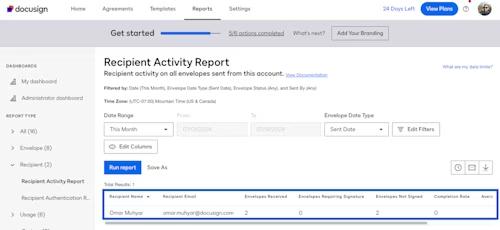
Numerous reports are available in this tab, so you’ll have to play around and see what works best for your record-keeping purposes.
View plan and billing information under Settings
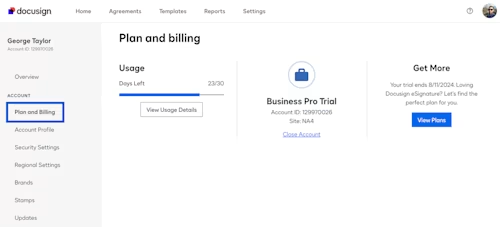
You can view your specific plan type and billing information under the Settings tab at the top of your account navigation, then Plan and Billing on the left.
Since this is a trial account, you’ll see it’s labeled as Business Pro Trial — as it’s based on the Business Pro paid account type. You’ll see how many days you have left for this free 30-day trial and the ability to view Docusign paid plans under the View Plans button on the right.
Once you're on the Plans and Pricing Page, you can toggle between annual and monthly pricing plans and click View All Plans for a side-by-side plan comparison. This is great for comparison shopping between different plans.
Additionally, the Docusign View Plans button and days left are viewable on your trial account's home tab, in the top-right portion of the upper navigation bar.
View your savings with the Value Calculator
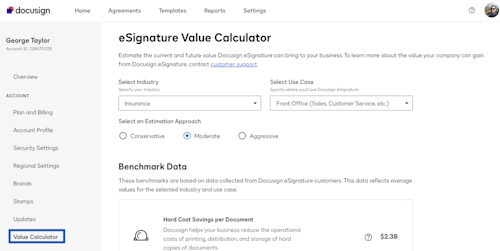
Another unique feature of the trial account is the Value Calculator, which allows you to view projected savings under specific industries, use cases, and estimated approaches (conservative, moderate, aggressive).
The Value Calculator is an excellent tool for gaining insight into the ROI of Docusign and conveying these savings to stakeholders responsible for signing off on software purchases.
You can find the Value Calculator under the Settings on the top navigation, then under Account and Value Calculator.
Interested in signing up for a Docusign plan?
Once you’ve used your free 30-day trial and run the numbers with our Value Calculator, it’s time to sign up for a Docusign plan to benefit from a streamlined agreement process.
If you have any questions about signing up for a Docusign plan, please get in touch with our sales team for a prompt response within one business day.
Related posts
Docusign IAM is the agreement platform your business needs


